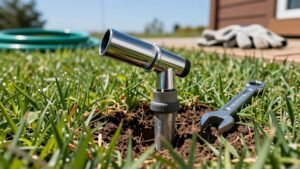
Grab the handheld shut‑off tool, place its jaws over the sprinkler head, squeeze the trigger, and the water stops instantly. Make sure the tool’s jaws are clean, align the probe, and apply firm pressure until flow ceases. Verify the head is marked to avoid confusion, and keep the kit within reach on each floor. For a temporary fix, use a compatible cap with Teflon tape and the correct wrench. Follow the checklist, and you’ll find detailed steps for longer‑term solutions.
How to Shut Off a Sprinkler Head in Seconds
One quick step can stop a sprinkler head from gushing water in seconds: grab the handheld shut‑off tool, place its tip over the head, and squeeze the trigger. You’ll halt flow instantly, preserving system integrity while the fusible link stays intact for re‑activation at 164 °F. Use the tool during planned system inspections to verify that each head responds correctly, and integrate it into emergency response planning for rapid intervention. Its one‑hand design lets you work from a safe distance, compatible with pendant, upright, wall‑mount, semi‑recessed, concealed, and institutional heads. You avoid the delay of shutting the main valve, keep full fire coverage, and prevent costly water damage—all without compromising the sprinkler network. Before starting, always turn off the water and depressurize the line to ensure safe handling. Remember to wear protective gloves when handling the tool to reduce the risk of injury.


Fire Sprinkler Stop Valve,Fire sprinkler tool, a reverse clamp with threads

For manually turning off water or gas lines in case of an emergency; Constructed from corrosion-resistant cast aluminum for excellent durability
When to Use a Shut‑Gun Tool Instead of the Main Valve
After you’ve stopped the offending head with the handheld tool, you’ll often wonder whether to keep the main valve closed or rely on the shut‑gun for the rest of the incident. Use the shut‑gun when you need seconds‑fast water stoppage and can’t locate the main valve quickly; it cuts 15‑25 gpm in an instant, preventing bathtub‑sized damage while preserving system operability. Because shutting the main valve disables the entire fire‑suppression network, it triggers fire‑watch duties, occupancy limits, and possible building closure—violating regulatory compliance and your fire safety responsibilities. The shut‑gun acts as a temporary sprinkler, keeping other heads active and buying time for a proper repair. Deploy it on floors with extinguishers, especially in warehouses or where valve access is delayed. The temporary fusible link heating element ensures rapid activation without needing to find the main or shutoff valve. Properly installing sprinkler heads requires adequate pressure regulation to ensure each head operates within its designed flow range. Selecting the right system also depends on soil type considerations to match water delivery with infiltration rates. Regularly checking spray patterns can reveal uneven distribution caused by head spacing errors and allow timely adjustments.
Step‑By‑Step: Shut off a Sprinkler Head With a Cap
If you need a quick, safe way to stop water flow from a single sprinkler, start by turning the main valve off, then expose the head, remove it, and cap the riser with a properly threaded flat cap sealed with Teflon tape. First, locate the valve, set the handle perpendicular, and shut it. Dig around the head carefully, avoiding pipe damage, and unscrew it. Identify the thread size, then follow How to pick the right cap: match the diameter, choose a flat PVC cap, and wrap Teflon tape for a leak‑free seal. Identifying shut off tool requirements means you need a wrench that fits without stripping threads. Screw the cap tightly, test for leaks, and adjust pressure if needed. This method is fast, reliable, and safe. Select the correct threaded cap based on the sprinkler’s male or female connection. Proper torque ensures a secure seal and prevents damage to the riser. Properly sealed caps prevent accidental water damage and maintain system efficiency.
How to Pick the Best Nozzle Cap for a Quick Shut‑Off
When you need a quick, reliable shut‑off, choose a nozzle cap that matches the sprinkler’s thread size, offers a simple screw‑on design, and works across brands like Hunter and Rain Bird. First, verify the cap’s thread—most pop‑up bodies use standard NDS threads, so selecting compatible cap size is critical. Consult installation manuals for model‑specific part numbers, such as Hunter PS Ultra’s P/N 916400SP or Rain Bird’s blank‑nozzle plug. Opt for a two‑piece system if you need freeze protection; the bottom insert sits in the cap and the top screws from above. A universal cap blocks flow completely, keeps the head visible, and prevents overspray. Use a bag of five caps for multiple heads to maintain a clean, professional landscape. Brand‑specific caps are not interchangeable, so ensure the cap matches the sprinkler make.
Installing a PVC Cap on a Riser for Permanent Closure
Because a permanent shut‑off protects the system from leaks and freeze damage, you’ll start by turning off the water, digging a shallow trench around the sprinkler head, and exposing the riser. Use a small shovel to reveal the riser, then unscrew the head assembly counter‑clockwise. Clean the pipe end, apply purple primer, and slip a PVC cap onto the riser. If you prefer a threaded cap, wrap Teflon tape on the threads before tightening—avoid cross‑threading. Apply Oatey medium‑clear PVC cement to a slip cap while the primer is still wet, then let it cure for 24 hours. Test for leaks, backfill the trench, and follow proper disposal methods for any removed caps or excess material. Consider alternative cap materials only if they meet local code and durability requirements. Prevent over‑watering is also a key benefit of capping unused heads. Loose fittings can cause the head to rotate unexpectedly, so ensure all connections are snug before capping. Properly adjust the spray pattern after re‑installation to maintain even irrigation coverage.
Safety Precautions for Using Shut‑Off Tools on Sprinkler Heads
Secure the shut‑off tool within arm’s reach before you start, then double‑check that the tool’s jaws, rubber pad, and pressure trigger are clean and undamaged. Keep the tool in a dedicated kit on each floor for quick tool; this is essential tool storage management and prevents delays during accidental activations. Before you work, mark the sprinkler head with a bright tag so you know which unit you’re sealing and avoid confusion with nearby heads.
Firmly insert the adjustable jaws, guarantee the rubber pad contacts the orifice, and align the probe toward the diffuser arms. Squeeze the handle while keeping your thumb clear of pinch points, and pump the trigger until flow stops. Verify a watertight seal, then release the tool with the quick‑release arm. Tag any shut valve if you later need a system shutdown. The upper arm slides around the threaded portion of the fire sprinkler, ensuring proper alignment.
Matching Caps and Plugs to Hunter, Rain Bird, and Other Brands
After tagging the head and confirming the shut‑off tool is ready, you’ll need the right cap or plug for the specific sprinkler model. For Hunter Pro‑Spray, use the 213600SP cap with its rubber O‑ring; it snaps on, seals without tape, and fits only Pro‑Spray bodies. Don’t try it on SRS, PSU, or rotary heads—brand specific compatibility matters. If you need a visible option, the 916400SP nozzle works for PS Ultras and Pro‑Spray. Rain Bird requires its own caps, such as the 1800 series; Hunter caps won’t seal a Rain Bird head, and cross brand fitting is untested and unsafe. Always match the cap to the manufacturer’s design to prevent leaks and maintain a tidy landscape. The newPro‑Spray blanking nozzle is a convenient alternative that also identifies the location of a blanked‑off pop‑up.
Troubleshooting Common Issues After a Quick Shut‑Off
Most issues you encounter after a quick shut‑off stem from blocked filters, damaged heads, or stuck valves, and they can be traced quickly with a systematic check. First, turn the water off and remove each nozzle. Rinse the filter; a brush or toothpick clears sand, mower cuttings, or storm debris that cause uneven spray. If water still won’t pop up, inspect the head for cracks or bent parts—replace it to restore proper flow. Next, examine both zone valves for debris that may keep them open; clear any blockage and verify the controller signals. Low pressure often points to a partially closed main shut‑off valve or zone regulator—open them fully. Following these steps avoids improper shutoffs and aids in identifying head related causes. Turn the screw on the spray‑type head to adjust the distance and amount of water. Raising the head slightly can improve coverage on uneven terrain. sprinkler head height is a key factor for achieving even water distribution. Properly aligning the sprinkler head’s spray pattern ensures consistent coverage across the lawn. Selecting the correct arc setting helps prevent both dry spots and overspray.
Restoring Full Coverage: Replace a Capped Head Safely
A capped sprinkler head can be swapped for a new one in just a few safe steps. First, turn off the main water supply and use a wrench to unscrew the cap counter‑clockwise, taking care not to strip the riser threads. Dig around the riser with a hand trowel, exposing it fully while avoiding other underground lines. Inspect the riser for damage, then thread the new head clockwise, securing it with a gentle jiggle test. Wrap seal tape around the joint, adjust the nozzle with a sprinkler tool, and restore the water flow slowly to check for leaks and proper rotation. Finally, apply soil restoration techniques: backfill the hole, use compaction methods with a trowel or shovel to firm the soil, replace sod, and water the spot to promote regrowth. The sprinkler head is often hidden in a forgotten section of the lawn, making it hard to locate without turning on the system. Follow the torque specifications to avoid over‑tightening and ensure a leak‑free connection. Proper capping can significantly reduce water waste by preventing over‑watering in low‑need zones. Adjusting the spray radius and arc can further optimize coverage and conserve water.
Your Quick Checklist for a Safe, Fast Sprinkler Shut‑Off
You’ll shut off a sprinkler head safely and quickly by following a short, step‑by‑step checklist: identify the head type and gather the right cap or plug, turn off the main water valve, inspect the riser threads, and wear gloves to protect your hands. First, confirm key safety considerations: shut off the main valve, wear gloves, and keep your clear of the spring. Next, use proper tool selection—adjustable wrench, screwdriver, or shut‑gun for fire systems—to unscrew the head counterclockwise. Remove the nozzle and spring gently, set them aside, and verify water flow stops. Then, screw the compatible cap or PVC plug onto the riser threads, tightening just enough to seal. Finally, briefly reopen the valve to test for leaks, then document the capped head. The Agrifim Universal Sprinkler Cap is a two‑part plug system that plugs the hole in the existing sprinkler cap. Properly adjusting the sprinkler’s arc radius ensures even water distribution and prevents dry spots. Measuring spray pattern helps you confirm that the head is correctly aligned before capping.