First level each head, wipe the nozzle clean, and make sure the pop‑up rises straight. For fixed‑side rotors, lock the turret and turn counter‑clockwise to widen the arc or clockwise to narrow it; for full‑rotation heads, turn the key fully counter‑clockwise for a 360° sweep or use a Hunter PGP tool to set any angle between 40° and 360°. Adjust the left edge first, then fine‑tune the right border until the spray covers the zone uniformly. Raise the head on slopes to reach lower areas, and check pressure before tweaking. If you keep going, you’ll uncover deeper troubleshooting tips.
Check and Level Sprinkler Head Settings Before Adjusting
Ever wonder why a few heads spray the driveway while others barely wet the lawn? You start by turning the system on and walking the perimeter, watching each nozzle’s spray. Spot heads that hit pavement, siding, or fences, and note any leaking or dry spots. Then verify sprinkler head alignment: the nozzle must stand straight, not angled, and the head should pop up fully. Adjust the sprinkler head position by wiping the top to expose the radius screw, then use a flat‑head tool to raise the head for clear visibility. Confirm the base is stable, the nozzle is seated, and the pop‑up functions under pressure. This precise visual audit sets the stage for fine‑tuning without overspray or gaps. Adjust the left hole to reduce the spray arc if it’s reaching unwanted areas. Understanding water distribution helps you fine‑tune pressure and flow for uniform coverage. Properly calibrating each head ensures that the sprinkler pattern matches the lawn’s dimensions and avoids waste.

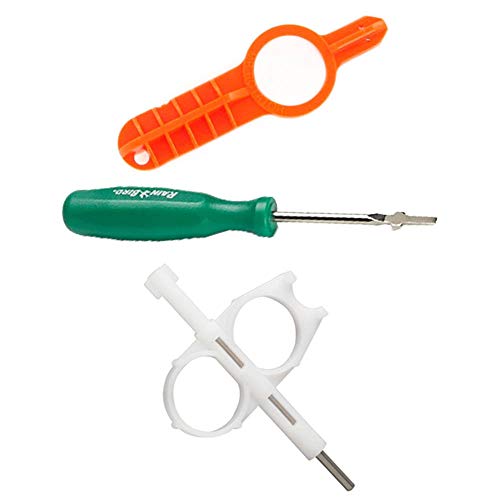
3 Pack of Rain Bird Rotor Tool (Rotor Screwdriver / Pull-up Tool)

STRENGTH AND DURABILITY: Made of heat-treated alloy steel

STRENGTH AND DURABILITY: Made of heat-treated alloy steel
Adjust Sprinkler Head Settings: Arc for Fixed‑Side & Full‑Rotation Heads
After confirming each head is level and properly seated, you can fine‑tune the spray arc. For fixed‑side rotors, lock the nozzle turret at the right stop, insert the brand tool, and turn counterclockwise to widen the adjustable spray patterns or clockwise to narrow them. Each full turn on a Rain Bird rotor shifts the arc about 90°, while Hunter models move the left stop relative to a stationary right stop. Test the setting by running water and watching the rotation pattern.
For full‑rotation heads, turn the key fully counterclockwise from the right stop to achieve a 360° sweep, or use the Hunter PGP tool to set any angle between 40° and 360°. Align the left edge first, then fine‑tune the right border until you reach ideal arc coverage across the zone. Verify with a brief water test, adjusting as needed for even distribution.
Turn off water while making adjustments to prevent spray in the wrong direction.
Raising the head can improve coverage on sloped areas by allowing the spray to reach the lower side of the lawn more effectively, especially when using a sprinkler head collar for height adjustment.
checking water pressure before adjustments ensures the sprinkler operates within its design specifications.
Proper soil testing helps determine nutrient needs and prevents over‑fertilization.
Hunter Key


The Hunter adjustment wrench consists of a 3/32 allen key, two convenient finger loops for gripping
Trim Sprinkler Head Settings: Spray Distance With Radius Screw & Deflector
When you trim a sprinkler head’s spray distance, the radius screw and deflector work together to shape the water pattern; turning the screw clockwise narrows the reach by restricting flow, while turning it counter‑clockwise widens the arc up to the nozzle’s full capacity. Use the appropriate hex key or flat‑head screwdriver to engage the radius screw fine tuning. Begin with a counter‑clockwise turn to clear the nozzle socket, then adjust clockwise until the stream just contacts the deflector edge. Verify the head sits level, then fine‑tune in small increments, watching the spray arc shrink or expand. If you reach the 25‑35 % reduction limit, consider nozzle replacement options instead of over‑tightening. This method guarantees precise, repeatable coverage without excess water waste. The radius adjustment screw can be turned while the sprinkler is running for convenience. Proper head selection uniform water distribution across the lawn. Following the guide ensures each head delivers the intended coverage radius for optimal irrigation efficiency. Understanding zone flow rate helps prevent over‑pressurizing the heads.

Handy pull-up tool makes easy work of lifting retracted geared rotor stems

The Rainbird Rotor Adjustment Tool is used to adjust and lift Rainbird rotors including 3500, 5000, 5000 Plus, 5500, Falcon 6504, 7005, 8005, EAGLE 351B, 32SA, 42SA and 52SA series

⭐【3 Pack Sprinkler Key Tool Set】This 3 pack sprinkler head tool set includes rotor adjustment screwdriver, rotor nozzles tool, adjustment tool. Designed compatible with Rain Bird and compatible with Hunter, this sprinkler head adjustment tool kit helps you easily adjust rotor heads, replace nozzles, and maintain your sprinkler system with one convenient set
Test Sprinkler Head Settings Coverage and Spot Dry/Over‑Watered Spots
A quick catch‑can test lets you pinpoint dry patches and over‑watered zones by comparing the water collected in identical containers placed under and between sprinkler heads. Set the cans evenly, half directly under heads and half in the gaps, then run the zone for fifteen minutes while keeping household water use off to eliminate water pressure variations. After the run, measure each can’s depth with a ruler, record the figures, and calculate the average precipitation rate. Uniform depths reveal consistent zone saturation patterns; low readings flag dry spots, high readings expose over‑watering. Note any discrepancies between shaded and sunny cans, then adjust head spacing or spray radius until the data converge, confirming head‑to‑head coverage across the entire lawn. Proper nozzle selection ensures each head delivers the intended throw. Remember to depressurize the system before any adjustments to avoid accidental spray bursts. Follow the step‑by‑step guide for replacing pop‑up sprinkler heads to ensure the riser is properly aligned and securely tightened.

TOOL-FREE INSTALLATION AND BROAD COMPATIBILITY: Fits most pop up sprinkler bodies for fast no-tool replacement delivering instant upgrades to your irrigation system.
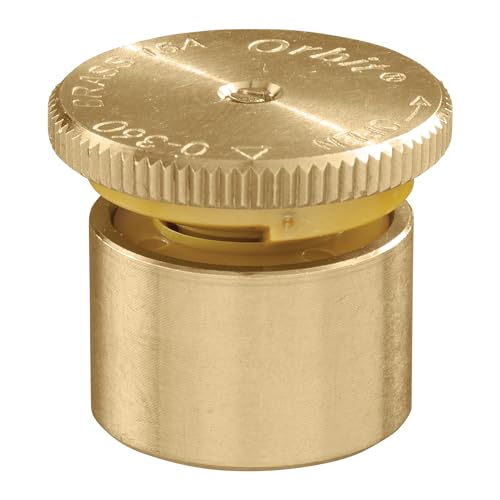
UNIVERSAL COMPATIBILITY: Designed to fit all major brands of pop-up spray heads, making it easy to replace existing nozzles and maintain your irrigation system. Delivers up to a 15-foot spray distance for efficient landscape watering (distance may vary based on PSI and other factors).

PRECISION ADJUSTABLE ARC, 0° TO 360°: Set exact spray angles for any landscape layout, from tight corners to full circle zones, with simple top adjustment
Maintain Sprinkler Head Settings for Year‑Round Performance
Keeping your sprinkler heads tuned year‑round starts with a disciplined seasonal schedule: spring you’ll set direction and activate the controller, summer calls for re‑activation and coverage checks, fall requires a controller tweak and deep cleaning, and winter shifts the controller to rain mode while you insulate the lines. In spring, perform season specific adjustments by aligning heads vertically, programming the controller for 70‑90 % runtime, and cleaning filters after the first rains. Summer demands routine inspections each month; verify head‑to‑head spacing, trim obstructing grass, and raise runtime to 100 % on hot days. Fall repeats the spring cleaning, adds a deep soak for mineral removal, and reduces runtime. Winter, set rain mode, insulate lines, and skip inspections until the thaw. This cycle preserves performance and minimizes waste. A common cause of leaks is a faulty valve that allows water to seep through when the system is off. Proper head alignment ensures even water distribution and prevents over‑watering. Loose fittings can cause erratic rotation and should be tightened during the spring inspection.
Fix Sprinkler Head Settings Issues: Leaks, Uneven Patterns, Stuck Stops
Leaking, uneven spray, and stuck stops are the three most common sprinkler‑head faults, and each can be diagnosed and corrected with a few focused steps. First, inspect the pop‑up for debris; clear it and tighten the head to stop leaks that waste water and harm root depth. Then, verify levelness with a spirit level; a tilted head skews the arc, creating dry spots. Adjust the nozzle turret to the left stop, hold the base, and twist until the left‑edge indicator aligns, ensuring the full 360° rotation. Cycle the system three times, confirming that stops lock cleanly. Ensure head is flat to maximize effectiveness. Incorporate these checks into your sprinkler maintenance schedule to achieve water usage optimization and consistent lawn coverage. Properly installing the riser and sprinkler head using a soil trench prevents future alignment issues. Select proper pipe diameter to maintain consistent pressure throughout the system. Include a flow control valve in the design to fine‑tune water distribution across zones.

For installation and maintenance of spray head sprinklers, nozzles, and risers

Sprinkler Tool Set: you will receive 8 green variable arc nozzles, 8 nozzle filters, 1 Spray Head Rotor Adjustment Tool and 1 rotor adjustment tool screwdriver. The complete sprinkler tool set provides you with more precise adjustment distance and arc of the lawn sprinkler system

⭐【3 Pack Sprinkler Key Tool Set】This 3 pack sprinkler head tool set includes rotor adjustment screwdriver, rotor nozzles tool, adjustment tool. Designed compatible with Rain Bird and compatible with Hunter, this sprinkler head adjustment tool kit helps you easily adjust rotor heads, replace nozzles, and maintain your sprinkler system with one convenient set
Quick‑Reference Cheat Sheet for Sprinkler Head Settings
After clearing debris and confirming levelness, shift focus to the quick‑reference cheat sheet that condenses every adjustment you’ll need.
- Arc adjustment: Insert a flat‑head screwdriver into the pattern slot. Turn clockwise to increase the arc up to 360°, counter‑clockwise to reduce it from the preset 40°. Rotate the turret left to the left stop and right to the right stop for full‑cycle alignment.
- Radius control: Locate the top radius screw marked +/−. Turn clockwise to extend spray distance, counter‑clockwise to shorten it. Test throw with water on; Rain Bird rotors use this screw for even coverage.
- Nozzle type: Identify the installed nozzle; each type may require specific deflector positioning. Adjust metal tabs or stops with pliers to fine‑tune direction.
Turn off water pressure before detaching the head to prevent accidental spray. Follow these steps, verify pattern after each tweak, and you’ll achieve consistent, balanced lawn irrigation.
Remember to depressurize the system to avoid sudden spray when making adjustments.
When installing a new head, ensure the sprinkler riser is properly seated to maintain correct height and alignment.