Turn off the main water by locating the ball‑type shut‑off valve—usually in the basement or utility closet and marked with a blue tag—then rotate it 90° clockwise. Gather a flashlight, flat‑head screwdriver, bucket, and adjustable wrench. Dig a 6‑8‑inch radius around the old head, remove it, clean the threads, and cap the pipe if needed. Cut a 1/2‑inch rigid riser to length, tape its male threads with PTFE tape, and screw it into the T‑fitting. Attach the new head, tighten by hand, adjust arc and radius, then test pressure for leaks before backfilling and re‑sodding; the next steps will show you how to fine‑tune spray patterns.
Shut Off the Main Water Supply and Gather Tools
Before you begin, locate the main water shut‑off valve—usually a ball‑type valve in the basement, utility room, or closet, marked with a blue tag and positioned between the water meter and the sprinkler lines. Verify the handle is parallel to the pipe, then rotate it 90 degrees clockwise until it stops, confirming proper shutoff valve operation. Use a flashlight to inspect the valve box, and keep a flat‑head screwdriver, bucket, and adjustable wrench nearby. Open the exterior drain near the backflow preventer; if unavailable, access the interior drain by removing the cap on the backflow preventer, turning the test port 45 degrees with the screwdriver, and positioning the bucket to catch runoff. Label the valve after identification to streamline future maintenance. Check for residual pressure before proceeding further.
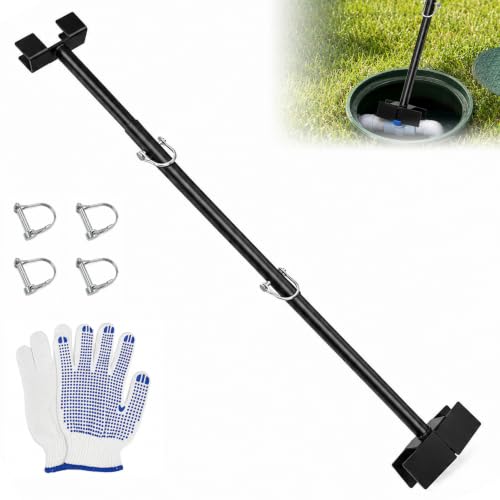
Product function: This extendable long handle ball valve wrench delivers strong torque to safely loosen tight worn or broken 1/2"2" PVC ball valves without cracking fragile handles As an all-in-one water shut off tool combining water meter key and backflow valve wrench it replaces multiple specialty tools for main valves backflow preventers irrigation sprinkler and fire riser plumbing maintenance
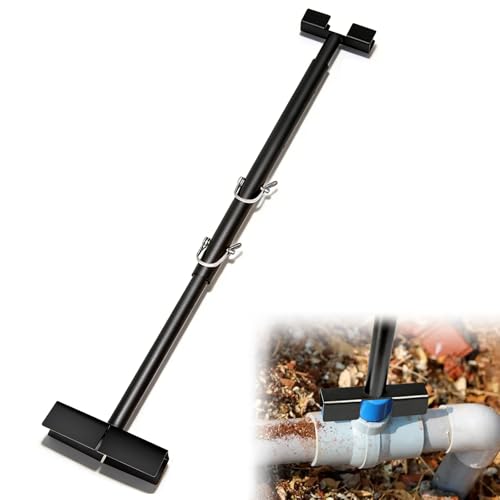
【Easy Leverage for Stuck Plastic Ball Valves (Comfortable with 1/2"–2")】This long-handle wrench gives strong leverage to turn tight, stuck, or ageing plastic ball valves without cracking fragile handles—even when worn, slippery, or partly broken.

Two tools combined into one convenient operator's tool that can be used wherever valves are adjusted for flow and pressure
Excavates and Remove the Old Sprinkler Head Before You Replace It
When you expose the sprinkler head by digging a 6‑8‑inch radius around it, you’ll be able to see the pipe’s base clearly and determine whether the head sits in the middle of the run or at the end. Use a shovel or garden spade to clear a 6‑8‑inch, few‑inch‑deep trench, avoiding nearby utilities. If the head is mid‑run, excavate fully to allow capping; if it’s at the line end, you may unscrew without full digging. Twist the head counter‑clockwise; apply pliers if hand‑turning stalls. Remove the head carefully, then wipe threads with a cloth to eliminate debris. Inspect for damage, clean the nipple, and cap the pipe if reconfiguration is needed. Follow these repair tips and address any troubleshooting issues before proceeding. Cutting the pipe and capping the end‑of‑line head allows for proper winterization. Remember to turn off the water before starting any work to prevent accidental spray and pressure buildup. Ensure you verify the sprinkler head type matches the system specifications to maintain consistent water distribution. Proper battery maintenance can extend the life of your lawn mower’s power source, reducing the need for frequent replacements.
Get the Riser Ready and Tape the Joint
After clearing the old head, you’ll see the exposed pipe and can now focus on preparing the riser. Choose a 1/2‑inch rigid poly cut‑off riser or a nipple riser with male threads, matching the pipe size. Cut the riser to a smooth, square end if you need a custom length, then wipe the threads clean of debris. Apply PTFE thread tape or a compatible sealant to the male threads, wrapping clockwise for three full turns to mitigate coupling leaks. Screw the riser into the T‑fitting by hand, then tighten enough to verify thread tightness without over‑torquing. Hand‑tighten first, then use a wrench only if a slight additional torque is required. Finally, confirm the riser stands vertical and the joint is sealed before proceeding. The sprinkler head was too low because the riser got stuck in dirt and mowed off. Properly adjusting the sprinkler head height can improve water distribution and prevent dry spots. Ensure the water pressure is within the manufacturer’s recommended range to avoid uneven spray patterns. Check for leaks after installation to verify a watertight seal.

1/2" x 6" Poly Cutting Riser

For connecting a spray head, impact, or gear-drive rotor to a sprinkler line UV-resistant HDPE construction suitable for lateral line use Male threads in 1-inch increment sections which allows riser to be cut to fit Cut-off riser extension allows you to extend a riser as landscape matures

7 - IN - 1 - ADJUSTBLE HEIGHT SPRINKLER RISER NIPPLE
Install the New Sprinkler Head to Complete the Replacement
Ready to finish the swap? Screw the new head onto the riser by inserting the tapered female end and turning clockwise until hand‑tight. Jiggle the head to confirm a firm lock; no Teflon tape is required unless you notice leaks. Align the head with the lateral line fitting if you’re using a swing joint. Next, set the head height level with adjacent heads, using sand to adjust elevation so the spray throws evenly across the zone. Perform a low‑pressure test, then raise pressure for 2–3 minutes to verify throw distance and leak‑free joints. If leaks appear, shut off water, apply seal tape, and retest. Finally, backfill the hole, compact soil, replace sod and water it. Proper nozzle selection and Optimize application rate for uniform coverage. Head-to-head coverage ensures complete water distribution without dry spots. Loose fittings can cause rotation issues, so inspect and tighten all connections before testing. Remember to check the sprinkler head torque spec to avoid overtightening. Correct pipe slope prevents water pooling and ensures consistent flow.

ADJUSTABLE ARC & SPRAY DISTANCE: Includes a preinstalled 3.0 GPM nozzle with an arc that adjusts from 40° to 360°, ideal for both full and part circle coverage. Delivers a spray distance of approximately 22 to 52 feet, with optional nozzles (sold separately) allowing further customization.

Smart Irrigation Starts Here - The Rain Bird 1804VAN 1800 Series Pack of 5 features 4-inch pop-up sprinkler heads with a fixed spray, variable arc nozzle and 1/2 in. female threaded inlet, made in the USA and built for precise irrigation in lawns, garden beds, and landscaped areas in residential and professional systems.

Sprinkler Head Pull Up Tool: Effortlessly lift and adjust sprinkler heads with the Spray Head Pull Up Tool, designed for easy use on buried pop up sprinklers. Compatible with Hunter, Rain Bird Sprinkler Heads, it's perfect for lawn irrigation system maintenance, nozzle replacement, rotor adjustment, and sprinkler cleaning
Adjust Nozzle Direction, Arc, and Radius After Installation
How do you fine‑tune a sprinkler’s spray after it’s mounted? First, secure the stem and ratchet the left edge of the spray pattern against the target border. Use a flat‑head screwdriver on Hunter’s arc screw: turn counter‑clockwise to widen the arc, clockwise to narrow it, stopping at 40°–360°. For Rain Bird VAN, align the left border, then rotate the adjustment ring to set the right border. Adjust radius by turning the radius screw clockwise to shorten throw, counter‑clockwise to extend up to the nozzle’s maximum—hold the nozzle edge to avoid over‑unscrewing. Rotate the entire rotor to point the nozzle center‑wise, using plastic collars on the memory disk for fine direction. Follow these steps for spray pattern optimization and nozzle obstruction prevention. Ensure the left side of the spray pattern is precisely aligned with the target border. Check water pressure before making adjustments to guarantee consistent throw distance. Verify the sprinkler coverage by walking the lawn and noting any dry spots after a test run. Properly mark wet spots using a hose or spray can to visualize coverage gaps.
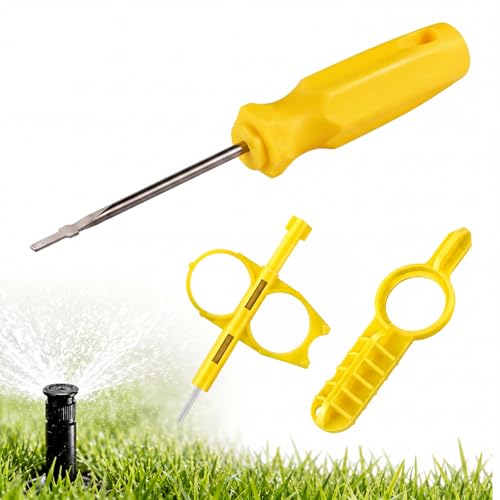
[COMPATIBLE WITH POPULAR SPRINKLER SYSTEMS] This sprinkler head tool is compatible with Hunter MP Rotator, PGP, PGH, PGM, I-20, I-25, I-40, I-60 rotors and PS series spray heads, as well as compatible with Rain Bird 3500, 5000, 5000 Plus, 5500, Falcon 6504, 7005, 8005, EAGLE 351B, 32SA, 42SA and 52SA series. Designed for common lawn irrigation repair, nozzle replacement, spray adjustment and routine sprinkler maintenance
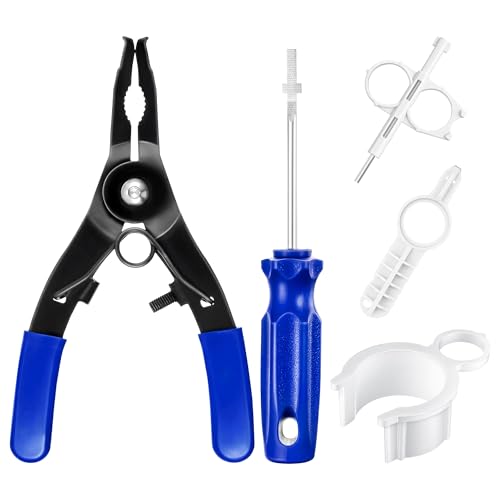
✅ [ALL IN ONE 5 PACK SPRINKLER TOOL KIT]This 5 pack sprinkler head tool set includes everything you need for lawn irrigation maintenance: rotor adjustment screwdriver, spray head pull up tool, hold up collar, rotor adjustment tool, and sprinkler key tool. Designed compatible with Rain Bird and compatible with Hunter, this complete kit helps you easily adjust rotor heads, replace nozzles, and maintain your sprinkler system with one convenient set

⭐【5 PACK SPRINKLER TOOL KIT】This 5 pack sprinkler head tool set includes everything you need for lawn irrigation maintenance: rotor adjustment screwdriver, spray head pull up tool, rotor hold up tool with bubble level, rotor nozzles tool, PGP adjustment tool. Designed compatible with Rain Bird and compatible with Hunter, this complete kit helps you easily adjust rotor heads, replace nozzles, and maintain your sprinkler system with one convenient set
Test Spray Pattern, Pressure, and Leaks
A proper test of spray pattern, pressure, and leaks starts by activating each zone individually and observing the water distribution for head‑to‑head coverage, consistent throw distance, and correct arc shape. You’ll run the zone, verify that each head reaches its neighbor within two feet, and confirm the arc matches the intended 90°, 180°, or 360° layout. Measure pressure at the manufacturer’s dynamic level, then add 15 psi to gauge precipitation rates; record any drop that shortens the throw. Inspect each nozzle for debris, scale, or damage; clean or replace to maintain uniform nozzle conditions. While the system runs, watch for misting or fogging that signals leaks, and check pop‑up heads for erratic spray. Guarantee consistent pressure levels across the zone before finalizing adjustments. Assessing water distribution helps identify uneven coverage early in the adjustment process. Properly adjust the sprinkler head radius using the adjustment screw to fine‑tune coverage and avoid over‑watering.

⭐【8 PACK SPRINKLER TOOL KIT】This 8 pack sprinkler head tool set includes everything you need for lawn irrigation maintenance: 1 pc rotor adjustment screwdriver, 1 pc spray head pull up tool, 3 pcs rotor nozzles tool, 3 pcs PGP adjustment tool. Designed compatible with Rain Bird and compatible with Hunter, this sprinkler head adjustment tool kit helps you easily adjust rotor heads, replace nozzles, and maintain your sprinkler system with one convenient set

⭐【4 Pack Sprinkler Key Tool Set】This 4 pack sprinkler head tool set includes 1 pc rotor adjustment screwdriver and 3 pcs rotary sprinkler tool. Designed compatible with Rain Bird and compatible with Hunter, this sprinkler head adjustment tool kit helps you easily adjust rotor heads, replace nozzles, and maintain your sprinkler system with one convenient set

For installation and maintenance of spray head sprinklers, nozzles, and risers
Backfill, Re‑Sod, and Verify Water Distribution for Your Sprinkler Head
After positioning the sprinkler heads, you’ll backfill the trench in 2‑inch layers, tamp each layer with a hand tamper, and keep the head perfectly vertical and flush with the finished grade. Compact soil around each head, checking for tilt before proceeding. Use a hand tamper every few inches to achieve uniform density without over‑compacting near the nozzle. Once the trench is filled, replace the saved sod, aligning edges tightly and watering immediately. Verify that the pop‑up height matches the finished grade and that swing joints are set for level adjustment. Finally, test water distribution: confirm head‑to‑head coverage, overlap throws to eliminate dry spots, and guarantee uniform spray across the zone. This sequence ensures code‑compliant installation and reliable performance. Regularly inspect for clogged heads to maintain optimal flow. If a valve fails to close completely, it can cause water to leak from the head even when the system is turned off, indicating a possible faulty valve issue. Remember to turn off water pressure before beginning any adjustments to prevent accidental spray.