First pick the right method: for slight dullness, attach a drill to the axle, run the reel backward 5‑10 minutes and reapply valve‑grinding compound; for rusted or heavily worn edges, use a 1‑inch metal file at the existing angle; for high‑hour use, employ the lapping technique—reverse the reel, spread lapping compound, and push the mower backward until the whole diameter is flat and shiny. Gather a flat‑head screwdriver, file, lapping compound, a drill with reverse‑rotation socket, and a measuring tape. Remove the drive wheel, pry off the plastic cover, and detach the reel, keeping note of gear positions. Clean debris with a rag and scraper, grease gears, then adjust the bed‑knife using the fine‑threaded screws until a thin paper strip slides snugly. Apply a thin layer of lapping compound to the bed‑knife, run the reel slowly to embed it, and reverse‑crank at low speed (≈30 rpm) while maintaining steady pressure. Inspect the blades for uniform shine and correct alignment; if you keep going, you’ll uncover deeper tips and troubleshooting tricks.
Choose the Right Reel‑Mower Blade Sharpening Method
Choosing the appropriate sharpening method hinges on your mower’s condition, usage frequency, and the tools you have on hand. If your reel shows minor dullness and you own a drill, attach it to the axle and run the reel backwards for 5–10 minutes, reapplying valve‑grinding compound until you see uniform blade shine. Adjust the bedknife screws for slight resistance, then push the mower forward to verify proper blade clearance. For rusty or heavily worn blades, use a 1‑inch metal file at the existing angle, rocking gently to expose clean metal and maintain uniform blade shine across each edge. When precision matters—such as high‑hour use—employ the lapping method: reverse reel rotation, apply compound, and push the mower backward until the entire diameter achieves a flat, shiny surface, confirming proper blade clearance before final adjustment. Proper blade angle is critical for cutting efficiency and can be checked with a digital protractor before finalizing the sharpening process. Always wear safety glasses during sharpening to protect your eyes from metal shavings.
Gather Tools for Reel‑Mower Blade Sharpening
After you’ve decided which sharpening method suits your mower, you’ll need the right tools before you start. Gather a flat‑head screwdriver for gear and pawl removal, a 1‑inch metal file for manual honing, and a scraper to clear rust from the bedbar. Keep rags and old oil handy for cleaning and reel‑mower bearing maintenance. For lapping, select a kit that includes lapping compound, a crank that fits most shafts, and applicator brushes; the kit’s manual guides you through the process. If you prefer power‑assisted honing, use a drill with a reverse‑rotation socket wrench and a diamond grinding wheel for hard‑edge blades. Finally, verify reel‑mower blade materials and geometry with a measuring tape and the special top‑grind angle tools. Sharp blades also promote a cleaner cut that reduces weed seed spread and improves overall lawn health. Remember to disconnect power before any blade removal to avoid accidental startup. Using a sharp mower blade helps maintain even grass height across the lawn.
Disassemble and Clean the Reel for Sharpening
If you start by removing the drive wheel—usually the left‑hand wheel when you face the mower from the rear—you’ll gain access to the reel and its components. Use a flat‑head screwdriver to pop off the plastic cover, then pry the U‑ring or C‑clip without bending it. Pull the wheel off, note the left and right gear positions, and set the gears aside separately. Remove the grass shield and chain cover, then unbolt the bedknife for giving the mower enough clearance. Loosen the attachment bolts and detach the reel, reorienting the pawls for backward rotation. Perform residual debris removal with a rag and a plastic scraper, employing proper tool selection to avoid scoring blades. Clean gears, pawls, and blade surfaces, then apply a light grease before reassembly. The front screw provides coarse adjustment for blade clearance. Always verify that the blade’s cutting edge is at the proper grinding angle before proceeding to the next step.
Adjust Bed Knife and Apply Lapping Compound
You’ll begin by loosening the reel from the bed‑knife, then use the hex wrench (or 5/8‑inch wrench on specific models) to turn the fine‑threaded adjustment screws until a thin paper strip slides snugly between the reel and the bed‑knife without tearing. Wear protective gloves, then insert a 2 cm paper strip at the left, middle, and right positions. Rotate the reel by hand; if the strip cuts cleanly, you’ve achieved proper blade to bedknife contact. If not, tighten the corresponding screw a click at a time, alternating sides, and re‑test. After confirming ideal reel to bedknife adjustment, apply a thin layer of lapping compound to the bed‑knife surface, spread evenly, and run the reel slowly to embed the compound, ensuring a uniform, low‑friction interface for the next sharpening cycle. Use a 6 mm hex wrench for precise adjustments. Properly leveling the mower deck ensures even cutting and optimal mower performance. Deck leveling should be performed regularly to maintain consistent cut height.
Reverse‑Crank the Reel for Lapping
One or two minutes of steady reverse rotation is enough to spread the lapping compound uniformly across every blade. Begin by attaching a 13 mm or 10 mm wrench to the reel’s end bolt; if the bolt is missing, use an adapter or offset wrench for leverage. Remove any drive chain that restricts backward motion, then set the mower on a stable surface. Engage the reel in reverse, either by hand‑cranking or by activating the engine’s reverse mode. Monitor rotational speed, keeping it low—around 30 rpm—to avoid overtightening. Apply consistent pressure as you turn, ensuring each blade contacts the bedknife with uniform force. Continue for one to two minutes, then stop, inspect the coating, and repeat if necessary. The valve lapping compound starts at 120 grit and works down to 220 grit for a finer finish.
Inspect Blade Shine for Uniform Alignment
A quick visual check of the reel’s metallic edges lets you confirm uniform alignment before any further testing. Position the mower under bright, diffuse light and perform a clean surface inspection of each blade edge. Look for a consistent metallic shine that reflects evenly across the entire reel; any dull or patchy spots indicate mis‑alignment or uneven contact with the bedknife. As you rotate the reel, verify blade condition by watching the shine stay uniform while the blade passes the bedknife. If the reflection varies, pause and note the locations that need adjustment. This methodical observation lets you pinpoint alignment errors without touching the blades, ensuring the reel is ready for subsequent precision tests. Ensure the mounting points are properly aligned to prevent uneven cutting. The carburetor is typically mounted near the engine’s side or rear, attached to the intake manifold and fuel line. Proper blade balance reduces vibration and extends mower lifespan.
File Rusty Blades Manually as a Backup
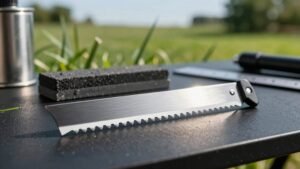
A handful of rust‑covered blades can be restored quickly with a one‑inch metal file, provided you follow a disciplined filing routine. First, remove the wheels with a narrow blade screwdriver and pop off the reel cover for unobstructed access. Hold each blade steady, clean any residue with a rag, then position the mower so the blade edge faces you. Using the manual file technique, push the flat file forward at a slight angle that matches the blade’s curve. Keep the file flat, and file each of the six blades systematically until silver metal appears, indicating rust removal. Rotate the reel manually to expose all surfaces, and repeat passes on one‑inch rust spots. This method guarantees rust damage prevention while delivering uniform sharpness in 15‑20 minutes. A basic set of 25 different blades can be used for this process.
Set a Maintenance Schedule for Blade Sharpening
After filing rusted blades, you should immediately integrate a regular sharpening cadence into your mower’s upkeep. Begin by consulting the operator’s manual to check sharpening schedule; note the annual baseline and any in‑season touch‑ups required for your usage pattern. For heavy‑use mowers, log a weekly backlap and a quarterly grind if edges remain rounded. Record each session in a maintenance log, marking dates, hours run, and observed blade condition. Verify mower maintenance before each session: guarantee the engine is off, the reel rotates freely, and no nicks or bends are present. Adjust the cutting unit after every grind, then re‑check alignment. Consistently following this methodical timetable preserves blade geometry, sustains ideal cut quality, and extends mower life. Lubricate the wheel gears regularly to ensure smooth operation. Sharpness directly impacts cutting efficiency and grass health.
Troubleshoot Common Blade‑Sharpening Issues
When the reel’s cut quality deteriorates, the first step is to identify which sharpening symptom is present—whether it’s a bedknife grinding defect, an excessive blade‑land width, a bent or damaged blade, an improper back‑lapping technique, or a post‑sharpening adjustment failure. If the bedknife shows uneven grinding, remove the bedbar, discard the old screws with a socket wrench and the Toro Special Tool TOR510880, then perform Bedknife recalibration before reinstalling. For blade‑land width excess, grind a 30‑degree relief angle, spin the reel to restore cylindrical shape, and verify the width. Bent blades require gentle hammer taps or plier twists; severe bends demand replacement. During back‑lapping, spin the reel backward 5‑10 minutes with lapping compound until a flat, shiny surface appears, then clean all residue. Finally, check Reel housing maintenance, re‑install blades with correct orientation, and test cutting performance. Understanding that most mower blades use a right‑hand thread helps ensure proper torque and prevent loosening during operation. Regularly inspecting the blade for micro‑chips can prevent premature dulling. Sharp blades reduce cutting resistance, leading to a clean cut that promotes healthier grass growth.