You should aerate this spring if soil soil’s 55°F55°F50 and the after grass’s frost frost grass compact, compacted, or has thatch over ¼ inch, because the warm, moist conditions will boost root growth and improve water and nutrient uptake. Mow to 1.5‑2 inches, water a day before, and use a core aerator with 2‑3‑inch tines, overlapping passes by 2‑3 inches. After aerating, water thoroughly and apply a phosphorus‑rich starter fertilizer within 48 hours; continued guidance will show you the full step‑by‑step process.
Decide If Spring Aeration Is Right for Your Lawn
When should you decide if spring aeration fits your lawn? Assess proper aeration timing by checking soil temperature; aim for 55 °F before weed germination. In Ohio, target early‑to‑mid‑March, avoiding wet or overly dry soil. Wait two weeks after the last frost until the soil warms to 50‑55 °F and grass shows active growth. Verify ideal soil conditions: look for compaction signs such as uneven winter growth, worn pathways, or heavy clay that stays hard after foot traffic. If you notice these indicators, aerate now to relieve compaction and improve water, air, and nutrient flow. Make certain you’re not using pre‑emergent herbicides, or aeration could break the barrier and invite weeds. Follow these steps to decide confidently. Mechanical core aerators are often rented to handle larger lawns efficiently. Proper timing also helps avoid stress on cool‑season grasses and maximizes root development. Aerating during the mid‑April to early May window ensures the soil is moist and the grass is actively growing. Adding a layer of organic mulch after aeration can further protect soil structure and retain moisture.
Identify Grass Species That Benefit From Spring Aeration
Three main grass groups—cool‑season (Kentucky bluegrass, tall fescue, fine fescue, perennial ryegrass), warm‑season (Bermuda, zoysia, St. Augustine, bahia, centipede), and their hybrids—show the greatest response to spring aeration because they enter active growth while the soil warms. When identifying different cool season grasses, focus on Kentucky bluegrass and tall fescue; both develop deeper roots and reduce thatch when aerated early spring. Fine fescue and perennial ryegrass also benefit from early‑season compaction relief. For comparing warm season grasses, schedule late‑spring aeration for Bermuda and zoysia, using double‑pass cores to improve nutrient delivery. St. Augustine, bahia, and centipede respond best after the soil reaches peak warmth, allowing rapid hole fill and vigorous growth. Follow species‑specific timing to maximize aeration efficiency. Aeration during the period when soil temperature consistently stays above 60 °F ensures optimal root activity. Proper timing also helps prevent soil compaction from worsening during heavy rains. Improved water infiltration further supports healthy root development during the growing season.
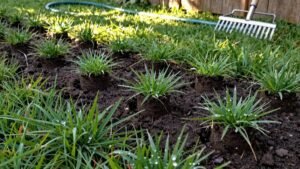
Spot the Signs Your Lawn Needs Spring Aeration This Season
If your lawn feels hard underfoot or a screwdriver meets resistance, the soil is likely compacted and needs spring aeration. Look for compaction indicators such as thin, patchy areas, yellowing turf, and persistent puddling after rain. Surface texture concerns appear when the ground feels concrete‑like, not springy, and when thatch exceeds a quarter inch. Check root depth by probing; shallow, lateral roots reveal inadequate aeration. Observe drainage patterns—slow infiltration or spongy spots signal compacted layers. Note any excessive thatch that blocks light and airflow. When these signs co‑occur, schedule core aeration to restore airflow, water movement, and nutrient pathways, ensuring robust root development and a healthier lawn. Proper aeration also improves seed‑to‑soil contact for more successful overseeding. Regular aeration helps soil aeration by creating channels that promote beneficial microbial activity. Incorporating proper dethatching before aeration can further enhance soil penetration and root growth.
Prepare Your Yard: Moisture, Marking Utilities, Tools
Detecting compaction and excess thatch tells you it’s time to aerate, and the next step is getting the yard ready. Begin with lawn prep considerations: mow the grass to 1.5‑2 inches, never cutting more than one‑third of the blade in a single pass. Schedule watering so the soil is moist but not soggy—apply one inch of water 48 hours before aeration, then let it dry slightly. Perform soil moisture monitoring to confirm the ground feels damp to firm; avoid aerating in drought or fully dry conditions. Mark all underground sprinklers and utility lines with flags or paint to prevent damage. Choose a core aerator for 2‑3‑inch plugs, using a weighted front to maximize penetration, or a hand tool for small areas. Follow these steps precisely before proceeding to aeration. Proper aeration enhances root oxygenation and promotes healthier grass growth. Understanding the role of soil aeration in nutrient uptake can further improve lawn resilience. Regular aeration also helps soil microbial activity thrive, leading to a more robust lawn ecosystem.
How to Aerate Your Lawn in Spring – A Simple Step-by-Step Guide
Timing is the key to successful spring aeration, so schedule it when the soil is warm, moist, and showing signs of compaction. First, mow the lawn to 1.5–2 inches, avoiding scalping. Set the mower one notch lower than usual to expose the soil surface. Choose a core aerator—manual for ≤1,000 sq ft, powered for larger areas—and load it with 2–3‑inch tines. Begin at a lawn edge, drive forward in straight rows, and overlap each pass by 2–3 inches. After the first pass, rotate 90° and repeat to create a grid; this achieves aeration pattern optimization. Make extra passes over high‑traffic zones. The tines will extract 2–3‑inch plugs, which you leave on the lawn for natural soil nutrient enrichment as they decompose. Early spring dethatching can improve aeration results by reducing thatch buildup before aeration. Using a hand aerator can be an effective alternative for small yards when a core aerator is unavailable.
Post-Aeration Care: Water, Fertilizer & Plug Management
After you finish the aeration pattern, the next step is to manage water, fertilizer, and the soil plugs to maximize recovery. Water thoroughly right after aeration, then keep the soil at ideal moisture levels—light, frequent applications for the first two weeks, delivering 0.5‑1 inch per session. After 24‑48 hours, taper to deeper watering to encourage root penetration. Apply a phosphorus‑rich starter fertilizer within 48 hours; this aligns with perfect fertilizer application timing for nutrient uptake. Follow with a slow‑release balanced fertilizer about three weeks later as temperatures cool. Leave the plugs on the lawn; they will decompose naturally, enriching the soil and supplying nutrients. Avoid traffic and wait a week before mowing to prevent re‑compaction. Monitor soil temperature to ensure it stays within the optimal range for seed germination. The typical cost of lawn aeration can vary widely based on regional price differences and whether you rent equipment or hire a professional.
Determine Aeration Frequency: Myths, Facts & Guidelines
Determining how often to aerate your lawn hinges on soil type, grass species, and usage patterns, not a fixed calendar. For clay soils, aim for an effective aeration frequency of once or twice per year; heavy clay with high traffic may need a couple of treatments to combat compaction. Sandy or loam lawns generally suffice with a single annual pass, especially if traffic is light. Align aeration with growth cycles: cool‑season grasses require early‑spring or fall work, while warm‑season varieties benefit from late‑spring to early‑summer timing. Guarantee the soil is moist but not saturated—ideal soil moisture levels facilitate plug removal and root recovery. Regularly assess compaction by probing the ground; if it feels rock‑solid or the turf looks thin, increase the frequency accordingly. Proper aeration also enhances nutrient absorption and promotes deeper root development. Dethatching can be performed before aeration to remove excess thatch and further improve soil aeration. Core aerators remove soil plugs which create channels for better water infiltration.
Common Mistakes to Avoid When Doing Spring Aeration
Don’t let a rushed start ruin your spring aeration. First, avoid ineffective aeration techniques: spike aerators compact soil, manual spiked tools push grass and thatch together, and liquid treatments only work in tiny spaces. Use a core aerator that extracts 2‑3 inch deep plugs 0.5‑0.75 inch wide, spaced 2‑3 inches apart. Prepare the lawn by mowing to half height, removing debris, and watering 1‑2 days ahead so the soil is moist but not soggy. Pay close attention to the consequences of improper timing—frozen ground cracks, extreme heat stresses recovery, and aerating outside active growth stalls root regrowth. During turns, keep the machine level, disengage tines, and maintain consistent depth to prevent bare spots and uneven surfaces. Follow with proper watering, fertilizing, and a recovery period. Adjusting the sprinkler head’s arc setting ensures even water distribution after aeration.
Should You Skip Spring Aeration? When Fall Is Smarter?
Skipping spring aeration often makes sense because fall provides a more favorable environment for root development and soil loosening. In fall versus spring aeration, compaction peaks after summer traffic, and cool‑season turf actively expands root zones before winter. Schedule aeration for mid‑September to early October, then overseed and apply slow‑release fertilizer; freeze‑thaw cycles will further open pores, priming the lawn for vigorous spring growth. Avoid spring aeration if the grass is emerging weak from dormancy, because pulling up tender shoots creates large holes and stresses the canopy. If you missed fall, use liquid aeration in late spring only after soil has thawed and compacted. Follow these aeration timing strategies to maximize root health and minimize damage.