Aerate your lawn yourself to break up compacted soil, create pathways for water, oxygen, and nutrients, and boost root respiration, which yields thicker, greener, more drought‑resistant turf. Choose a core aerator for clay, a spike model for light soils, and match tine size to moisture levels. Mow to 1.5–2 inches, water 1 inch a day or two before, then run the aerator in overlapping, criss‑cross rows 3 inches apart and 2–3 inches deep. Leave the plugs on the surface—they’ll decompose, releasing nitrogen, phosphorus, and organic carbon, enhancing soil structure and reducing fertilizer needs. Continue for, and’ll discover ideal overseeding, timing, and cost‑benefit tips.
Why DIY Core Aeration Boosts Lawn Health
When you core‑aerate your lawn, the removed 1‑2‑inch soil plugs instantly break up compacted layers, creating pathways that let water, oxygen, and nutrients flow freely to the roots. The holes loosen dense soil, producing increased oxygen flow that fuels deeper root respiration. Simultaneously, the channels enable improved nutrient distribution, allowing fertilizers to reach the rhizosphere without blockage. By disrupting hardened strata, you open corridors for root expansion, encouraging a denser, drought‑resistant network. The process also enhances drainage, reducing runoff and preventing waterlogging. Over time, the combination of better oxygen access and efficient nutrient delivery yields thicker, greener turf that recovers quickly from traffic stress and disease pressure. This technical, precise intervention maximizes lawn resilience with minimal effort. Aeration also helps prevent soil compaction by regularly loosening the soil matrix. Regular aeration promotes soil aeration which supports microbial activity essential for nutrient cycling. Properly timed aeration can also improve seed‑to‑soil contact for more successful overseeding.
Choose the Right DIY Aeration Method for Your Soil
Core aeration’s impact on oxygen and nutrient flow sets the stage for selecting a method that matches your soil’s characteristics. For clay lawns, prioritize compaction reduction techniques; a core aerator with 2‑inch hollow tines, 2‑inch spacing, and double‑pass coverage extracts plugs, loosening compact layers. If budget limits you, a spike aerator offers affordable entry, but expect limited relief on heavy clay. Sandy or loam soils tolerate less aggressive treatment—use a push‑behind machine or manual garden fork for spot aeration, ensuring 4‑inch penetration without over‑compacting surrounding particles. Match tine diameter and spacing to moisture level: tighter spacing removes more soil, enhancing airflow. Select the specialized aeration equipment that aligns with your lawn size, soil type, and desired frequency of treatment. Regular aeration also promotes deeper root growth and improves drought resilience. Proper timing during the growing season maximizes soil recovery and overall lawn health. Manual aeration can be performed with a garden fork by inserting the tines 2‑3 inches deep and rocking the fork to create holes at 6‑inch intervals.
Prepare Your Lawn the Day Before Aerating
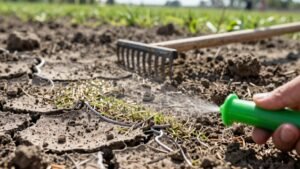
If you want the aerator tines to bite cleanly, make sure the lawn is properly prepped the day before. First, mow using reliable mowing equipment recommendations—prefer a reel or rotary mower with a sharp blade—cutting grass to 1.5‑2 inches, adhering to the one‑third rule to avoid scalping. Bag or compost clippings for a clean surface. Next, water the area with an inch of water 24‑48 hours prior, checking moisture with a tuna‑can test or screwdriver; soil should be moist but not soggy. Then, remove all debris: rake leaves, clear toys, furniture, and tools, and flag any underground sprinkler heads. Finally, perform a quick inspection for compact soil; if you feel resistance, water lightly to soften it before aeration. Soil testing should be done 2‑3 weeks before aeration to ensure the pH is within the optimal 6.0‑7.0 range. Timing aeration during the optimal seasonal window maximizes root growth and lawn recovery. Applying a thin layer of peat moss after seeding helps retain moisture and protect seedlings.
Run the Aerator in a Grid for Even Coverage
After you’ve prepped the lawn the day before, run the aerator in a grid to ascertain even coverage. Start at a corner, move in straight lines, and overlap each pass by 2–3 inches. Then execute a perpendicular pass, creating a criss‑cross pattern that fills gaps and produces 20–40 holes per square foot. Adjust aeration pattern spacing so holes remain roughly 3 inches apart, and keep each core 2–3 inches deep. Use a motorized core aerator for large areas, but a manual unit works if you minimize equipment use and space holes 4–6 inches apart. Inspect the surface for uniform plugs, mark obstacles, and give extra passes over high‑traffic zones to guarantee thorough, precise aeration. Aeration improves nutrient uptake by allowing water and fertilizer to reach deeper soil layers. Proper timing of post‑aeration watering seed germination success and promotes vigorous root development. For cool‑season grasses, schedule aeration in early fall to align with peak root growth. Early spring aeration can also help relieve compaction before the growing season begins. Optimal timing is key for maximizing soil health and turf resilience.
Leave Soil Plugs on the Surface to Recycle Nutrients
Because the plugs you pull up contain fertilizer and organic matter, leaving them on the lawn lets nature do the work of recycling nutrients. You should water the lawn within 48 hours, then apply short watering sessions three to four times weekly to maintain ideal soil moisture levels without oversaturation. This moisture regime accelerates natural decomposition impacts, allowing microbes to break down the plugs over two to three weeks. As the plugs “melt” back into the soil, they release nitrogen, phosphorus, and organic carbon, enriching the root zone and improving soil structure. The resulting nutrient influx reduces the need for supplemental fertilizer, promotes stronger root growth, and sustains a healthy microbial ecosystem throughout the lawn. Cores on the ground can create muddy, compacted areas if trampled on. Diesel fuel can act as an effective weed suppressant when applied correctly, though it carries significant environmental risks. Proper timing of dethatching ensures the lawn recovers quickly and maximizes the benefits of nutrient recycling. Seasonal timing helps align dethatching with peak growth periods for optimal results.
Pair Overseeding With Aeration for Thicker, Greener Turf
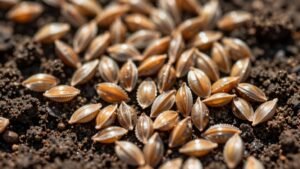
Pairing overseeding with aeration creates a denser, greener lawn by simultaneously loosening compacted soil and delivering seed directly into the newly opened pores. First, aerate using core or slicing methods to break compaction, improve oxygen flow, and expose a clean seedbed. Immediately follow with quality seed selection, spreading 5 lb per 1,000 sq ft to guarantee uniform coverage. Press the seed into the pores with a roller or light tamp to maximize seed‑to‑soil contact. Maintain adequate soil moisture—keep the surface damp but not soggy—until germination appears in 7–10 days. This sequence enhances water retention, nutrient uptake, and root development, yielding thicker, pest‑resistant turf while suppressing weeds and reducing bare spots. For best results, schedule the process in early fall when soil temperatures are optimal for root growth. Regularly checking soil compaction levels after aeration helps ensure long‑term lawn health. Late‑season dethatching can also be effective if the grass remains actively growing and moisture is sufficient.
Which Fertilizer and When After Aerating for Maximum Absorption?
You’ve just opened the soil’s pores, so the next step is to feed the grass while the holes are still fresh. Choose a suitable fertilizer type with a balanced NPK ratio matched to your soil test; a high‑quality starter blend such as Milorganite (4 : 1 seed‑to‑fertilizer by weight) works well for root establishment. Apply the fertilizer within 24–48 hours of aeration, preferably immediately if you’re not overseeding. If you do overseed, wait the full 48 hours before spreading nutrients. After application, water lightly to activate the granules and keep the soil consistently moist for several days. Limit foot traffic, maintain post fertilization care, and monitor for uniform absorption to maximize growth and weed resistance. Adequate soil moisture is essential for the fertilizer to dissolve and reach the newly exposed root zones. Proper timing of fertilization after aeration enhances nutrient uptake and promotes a denser, more resilient lawn. Grass seed should be applied before fertilizer to ensure optimal germination and soil preparation. Applying fertilizer during the early spring window maximizes nutrient availability when grass actively resumes growth.
When’s the Best Time to Aerate Your Lawn?
When should you aerate your lawn? Target the active growth window of your grass type. For cool‑season lawns, schedule early fall or early spring; Virginia’s Tall Fescue thrives late August through early November. For warm‑season lawns, aim late spring to early summer—late May to July—when turf emerges from dormancy. Guarantee soil moisture is moderate: water the day before or aerate after a light rain, but avoid bone‑dry or water‑logged conditions. Do not aerate dormant or heat‑stressed lawns; extreme heat and drought delay plug recovery. Incorporate proper aeration equipment selection, using core‑spike or plug‑type tools suited to soil compaction. Factor lawn aeration frequency considerations: most lawns benefit from one to two aerations per year, timed to coincide with peak root growth for ideal nutrient uptake and rapid surface filling.
DIY vs. Pro: Aeration Cost Comparison
A typical lawn‑care budget shows that DIY aeration can cost anywhere from $700 to $1,200 per year when you factor in equipment rental or purchase, seed, fertilizer, fuel, and maintenance, whereas hiring a professional service usually runs $1,500 to $2,500+ annually, covering labor, commercial‑grade machinery, insurance, and often bundled overseeding. When you rent a core aerator, expect $60‑$120 per day plus a $90 deposit; a full‑day rental averages $100, while manual tools range $50‑$100 for small lawns. DIY aeration time commitment totals 50‑80 hours annually, including fuel and tune‑ups ($100‑$200). Professional rates vary by size: $75‑$100 for <5,000 sq ft, $100‑$150 for 5‑10k, $150‑$200+ for >10k, averaging $181 for 12k sq ft. The higher upfront cost of pro services reflects commercial equipment, insurance, and bundled overseeding, while DIY offers lower cash outlay but greater labor input and rental deposit considerations.