Turn off the water, remove the filter screen and scrub it with a soft‑bristle brush, then rinse and reinstall. Measure static and dynamic pressure; if it’s low, check for clogged filters, closed valves, or damaged pipes. Inspect the collar and pop‑up mechanism for debris or worn gears, and replace any broken parts. Adjust the left‑stop and right‑stop screws to set the proper arc, and fine‑tune the radius with the top adjustment screw. If the head still won’t spin, the next steps will show you how to replace the head and verify full rotation.
Why Isn’t My Sprinkler Head Turning?
Typically, a sprinkler head won’t turn because debris or dirt has clogged its internal mechanism. You should inspect the head monthly, clearing grass, soil, or foreign objects that may jam the gear train. If cleaning doesn’t restore rotation, verify that the head was installed correctly; misaligned mounting brackets or recessed positioning can restrict movement. Examine the system for aging components—gears, seals, and bearings degrade after ten years, reducing torque and causing intermittent lock‑up. Low water pressure, often a symptom of damaged pipes or closed shut‑off valves, also hampers gear engagement. Finally, assess filters; a dirty filter limits flow, lowering pressure needed for rotation. Adjusting the fixed edge on a rotary sprinkler can also resolve rotation problems. Address each factor methodically before considering head replacement. Properly setting the spray radius ensures uniform coverage and helps identify if rotation issues affect irrigation performance. Remember to depressurize the system before performing any maintenance to avoid accidental water spray. Regularly checking the spray pattern can reveal uneven coverage before it becomes a larger issue.
Quick Diagnosis: Which Zones Fail to Rotate?
If debris or pressure issues have been ruled out, the next step is to pinpoint which zones actually experience rotation failure. Run the controller through each zone sequentially, watching every head as it activates. Record zones where heads stay stationary, noting whether the failure is consistent or intermittent. Walk the yard during activation; mark each non‑rotating head on a diagram and count the percentage per zone. Evaluate spray pattern anomalies—straight streams or weak mist can indicate stalled rotors. Measure water output volume to confirm reduced flow in affected zones. Compare adjacent zones to isolate isolated failures and group zones sharing supply lines. Prioritize zones with total non‑rotation for deeper inspection, logging all findings for targeted repair. The adjustment screw can be turned clockwise to increase the arc of rotation if the head is not turning fully. Properly setting the arc distance ensures uniform coverage and prevents overspray. Ensuring the proper sprinkler head type for each zone helps maintain consistent rotation and pressure.
Check Water Pressure & Filter Clogging When Head Won’t Rotate
When a rotor head refuses to spin, the most common culprits are insufficient dynamic pressure and a clogged filter screen; both conditions can be verified with a few systematic checks. First, measure static water pressure at the source with a calibrated gauge; guarantee it meets the manufacturer’s baseline before proceeding. Next, activate the zone and read dynamic pressure in the nozzle stream using a pilot tube. Compare the two values to locate total system loss, accounting for meter (≈5 PSI), backflow device (≈4 PSI), zone valve (≈3 PSI), main line (≈2 PSI), and lateral line (≈1 PSI) drops. If dynamic pressure falls below the rotor’s operating range, adjust pressure reducers, flow‑control stems, or zone‑specific regulators to maintain static water pressure and optimize zone specific dynamic pressures. Finally, inspect the filter screen for debris; a clean screen restores flow and prevents artificial pressure loss. Properly aligning the sprinkler head’s spray arc can also improve coverage and reduce water waste, especially when using a spray pattern that matches the lawn’s layout.
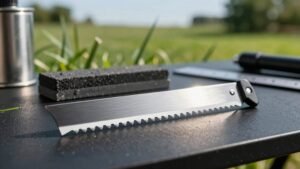
Remove and Clean the Head’s Filter Screen Properly
Start by turning off the water supply, then locate the filter screen on the underside of the nozzle or inside the cap. Pull the riser up, unscrew the green cap by hand, and lift the nozzle to expose the flat or conical screen. Use a soft‑bristle brush or toothbrush to scrub the screen, avoiding metal brushes that could damage plastic. Rinse the screen and nozzle under running tap water; for stubborn debris, soak the head for 20‑30 seconds and flush with a cap. After cleaning, reinsert the screen, align any white lines on pre‑2023 conical filters, and hand‑tighten the cap before securing the Torx screw. This routine of using proper filter maintenance helps keep flow consistent and is preventing future filter clogs. Clogged sprinkler head can cause uneven spray patterns that waste water. Properly assess water distribution to ensure the adjusted head delivers even coverage across the lawn. Regularly inspect the sprinkler system for low pressure to catch issues before they affect rotation. Check the head’s torque] to avoid over‑tightening and damage.
Inspect and Clear Debris Around the Collar and Pop‑Up Mechanism
Even before you disassemble the head, inspect the collar and pop‑up mechanism for any material that could impede movement; grass clippings, dirt, or mulch often accumulate around the collar and block the riser’s extension, while soil may sink the head or tilt it off‑axis. Use a soft brush or hand to clear debris, then press the riser down firmly four to five times with your foot while the zone runs to flush remaining particles. Conduct an internal component inspection of the pop‑up housing; guarantee the nozzle opening is free of clippings, rocks, and sand. Verify that the rotating mechanism wear is minimal by rotating the head manually; any resistance indicates lingering sand or silt in the bearing nipple washers. If the head sits low, excavate surrounding soil, level it, and replace sod only after confirming full pop‑up clearance. Follow the step‑by‑step guide for proper water shut‑off before beginning any repairs. Adjust the spray radius and arc using the adjustment screw to match the desired coverage pattern. Properly capping the sprinkler head can prevent excessive water use and promote a healthier lawn.
Adjust Left and Right Stop Positions for Correct Rotation Arc
You’ll first locate the left‑stop adjustment point, turn the sprinkler head counter‑clockwise until the head reaches its left‑most position, and then continue rotating the top housing to push the left stop over the desired starting point. After the left stop clicks, grip the canister body, rotate it until the left edge aligns with the intended start, and lock the position. Next, apply gentle pressure to the top and turn clockwise until the right stop meets resistance; use the plus/minus screw to fine‑tune the rightward limit. Verify that the right stop remains outside the trip‑stop for partial arcs. Finally, test the full rotation, confirming that the arc matches the desired range, which helps align rotation timing properly and maximize drive gear lifetime. Adjust the radius screw to set spray distance while the sprinkler is running. Ensure the sprinkler head is properly seated on the riser to prevent leaks and maintain consistent water pressure.
Fine‑Tune Rotation With the Adjustment Screw
Typically, you locate the flat‑head adjustment screw on the nozzle’s top, then turn it clockwise to shorten the spray radius or counter‑clockwise to lengthen it, watching the water stream as the screw nudges into or away from the flow. Begin by confirming the screw type—arc or radius—using the visual cues on your model (X‑shaped slits, plus/minus signs, or arc arrows). Turn the screw in small increments, observing each three‑cycle test to gauge distance changes. Clockwise moves reduce arc distance, helping you reduce zone overlap; counter‑clockwise expands the arc, allowing you to optimize arc distance for uniform coverage. Stop before the screw contacts the set‑stop to avoid nozzle ejection. Record the final position, then verify that adjacent heads no longer overlap. The screw that controls water distance can be fine‑tuned to achieve precise coverage. Proper head placement ensures that each sprinkler reaches its intended area without creating dry spots that can stress the lawn.
Identify and Replace Worn or Broken Internal Gears
When the sprinkler head stops swinging or only turns one way, the internal gears are likely worn or broken. First, verify the symptom by turning on the system and watching the head pop up; if it fails to rotate, inspect the canister top for mud, debris, or cracked fittings. Unscrew the internal canister counter‑clockwise, then detach the upper portion without digging the whole unit. Extract the gear set, clean all debris, and examine teeth for wear, misalignment, or breakage—these are common gear replacement problems. For cost effective gear maintenance, use like‑for‑like parts matching the brand (Rainbird, Hunter, Orbit, Toro). Slide the new gears into the existing casing, hand‑tighten, and reinstall. Test rotation under proper PSI to confirm full, even coverage. The sprinkler’s nozzle size is 2.0 and matches the replacement unit. Properly check the water pressure before installing the new head to avoid future performance issues.
Replace an Old Sprinkler Head When Needed
One or two steps can get a faulty sprinkler head replaced without hassle. First, shut off the irrigation system at the main valve or controller to prevent spray and protect pipe integrity. Dig a 6‑8‑inch radius around the head using a shovel, exposing the riser without damaging surrounding pipes. Unscrew the old head counter‑clockwise with a wrench or pliers, then wipe the threads clean with a cloth, removing soil and debris that could impair soil moisture sensing. Inspect the riser for cracks; if none, wrap several layers of Teflon tape on the new head’s threads. Screw the new head clockwise until snug, level it with the ground, and backfill with soil, tamping gently. Finally, verify that the replacement integrates smoothly with existing drip irrigation systems. Consider adjusting coverage to ensure even water distribution after relocation. Properly aligning the head’s height to the ground level helps maintain consistent spray patterns and prevents damage to the sprinkler riser.
Check That the Head Spins and Pops Up After Re‑assembly
After you’ve removed the old head and installed the new one, the next step is to confirm that the head spins and pops up correctly when you re‑assemble it. First, re‑attach the filter screen, then tighten the top until the plastic components reset into their original positions. Next, turn the water back on and observe the head. If it fails to rotate, adjust rotor settings by turning the adjustment screw clockwise in small increments until the spray pattern aligns and the head lifts. Use a vice grip to hold the head extended while flushing water through the system to clear residual debris. Finally, release the grip, watch the head pop up and spin, and verify smooth operation before concluding the repair. Faulty valve can also cause the head to stay closed or leak when the system is off. Remember to wear protective gloves while handling the components to prevent injury.