First, disconnect the spark plug wire and wear protective gear, then drain the old fuel and refill with fresh, ethanol‑free gasoline mixed with a stabilizer. Pull the spark plug, clean or replace it, and inspect the carburetor for gum‑covered jets; soak the parts, rinse, and dry before reinstalling with the correct gasket and bolts. Check the drive belt for cracks, replace it if needed, and verify the recoil‑starter spring tension. Finally, run a short test, sharpen the blade, and confirm even cuts—continue for deeper details.
Safety First for Lawn‑Mower Repair – Disconnect Power & Wear Gear
A few essential steps keep you safe when repairing a lawn mower: always disconnect the power source before you start any inspection, adjustment, or blade removal. First, turn off the engine and wait for moving parts to cease; stored energy can keep the blade spinning briefly. Then unplug the cord or pull the spark plug out, never yank the cord. Next, don protective eyewear, hearing guards, and heavy‑duty non‑slip shoes. Use goggles to block debris, earmuffs if noise exceeds 85 dB, and gloves to shield hands from hot surfaces and sharp edges. Keep a stick or broom handle for deck cleaning, never your hands. By following this systematic checklist you prevent injury and maintain alertness throughout the repair. Remember to maintain a stable stance and engage your core muscles when lifting the mower to protect your back proper lifting technique. Always read the owner’s manual for specific safety warnings before beginning any repair. Additionally, consult the mower’s safety features such as the blade guard to ensure they are intact and functional before work.
Drain Old Fuel and Add Fresh Gas to Resolve Start Issues
Why does your mower sputter or refuse to start after sitting idle? Stale fuel clogs the carburetor, and ethanol blends accelerate degradation. First, park the mower on a flat surface, disconnect the spark plug wire, and place an approved gas container beneath the tank. Use a siphon pump: remove the tank cap, submerge the long hose in the fuel, and run the short hose into the container. Pump until flow stops, then tilt the mower gently to drain residual fuel. Alternatively, locate the fuel line, release its clamp with pliers, and direct the fuel into the container. After the tank is empty, dispose of old gas or reuse it if it smells fresh. Refill with ethanol‑free gasoline mixed with a fuel stabilizer, run the engine a few minutes to circulate the stabilizer, then reconnect the spark plug wire. This systematic drain and refill restores reliable starting and protects the engine. If the mower still won’t start, the carburetor jet may be blocked. Ensure you work in a well‑ventilated area and wear gloves to avoid skin exposure to flammable gasoline. Remember to protect the environment by properly disposing of the used oil according to local regulations. A weak or dead battery can also prevent the engine from cranking properly.

UNLEASH YOUR ENGINE'S FULL POTENTIAL - Star Tron Enzyme Fuel Treatment uses advanced enzyme technology to ensure all engines start easily and run smoothly, even after months of inactivity

New Standard of Antioxidants and Anticorrosives

Inspect and Clean a Wet or Fouled Spark Plug
Once the old fuel is removed and fresh gasoline is added, the next step is to examine the spark plug for wetness or fouling. Disconnect the plug lead, clean the surrounding area, and use a spark‑plug socket to extract the plug safely. Look for black dry soot, oily deposits, or a wet appearance; each indicates carbon fouling, oil fouling, or flooding. Inspect the insulator tip for cracks and the electrodes for wear. If the plug is merely fouled, soak it in carburetor cleaner, scrub with a toothbrush, then dry thoroughly. Perform a gap adjustment with a calibrated tool, targeting the manufacturer’s 1.1 mm spec. Conduct a reuse assessment: if deposits remain, the insulator is damaged, or electrodes are rounded, replace the plug before reinstalling. Use a magnetic socket for easy removal and to avoid cross‑threading. Always wear safety goggles and gloves when handling fuel and cleaning the plug to prevent injury and spark plug safety. Remember to secure the mower before starting any maintenance to avoid accidental starts. Check for spark by grounding the plug and pulling the starter cord to confirm proper ignition.

Replace part number: Substitut For Old Bri-ggs & Stra-tton 19374S/19374/690966/19576

Essential Tool:It is not only Lightweight, small size, but also helps you to remove and install spark plugs quickly and easily. Spark plug wrench tool can effectively fasten spark plugs and minimize damage

Eassential Tool:It is not only Lightweight, small size, but also helps you to remove and install spark plugs quickly and easily. Spark plug wrench tool can effectively fasten spark plugs and minimize damage
Disassemble Carburetor and Remove Varnish Deposits
Typically, you’ll start by shutting off the fuel valve, disconnecting the fuel line, and removing the overflow hose before loosening the front and rear clamp screws that hold the carburetor to the engine. Next, untwist the throttle cable cap, separate the throttle assembly, and wiggle the carburetor free. Unscrew the four float‑bowl screws, keep the gasket intact, then slide out the retaining pin to lift the float. Inspect the needle tip and jet with a wire; note any gum, varnish, or sludge. Soak the disassembled parts in a dedicated cleaning bath—equal parts acetone, xylene, and lacquer thinner works overnight for heavy buildup. Rinse with hot water, spray cleaner through passages, and blow dry with compressed air. Finally, lubricate control linkages and troubleshoot electronic ignition to confirm the system operates smoothly. Use a 10 mm wrench to tighten the sediment bowl after reassembly. Proper airflow regulation ensures the engine runs efficiently after reassembly. A rich fuel mixture can cause the engine to backfire if not corrected during cleaning.

Instantly dissolves deposits on venturi, linkages, butterflies and PCV systems to improve fuel system performance and enhance fuel economy.

Package Includes: set of 6 carburetor cleaner kit, 20 cleaning needles + 10 nylon brushes + 26 cleaning wires. Brush diameters: 2mm, 3mm, 4mm, 5mm, 7 mm. Length: approx. 5.1 inches/ 130 mm.. Wire sizes diameters: 0.4, 0.5, 0.6, 0.7, 0.8, 0.9, 1.0, 1.1, 1.2, 1.3, 1.4, 1.6mm and 2 Sharp Pick
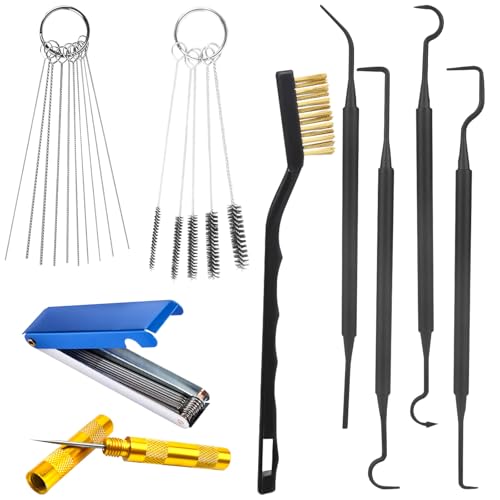
【Material】Engineered for performance and longevity, our carburetor cleaning kit utilizes high-grade stainless steel and tough nylon. The stainless steel components offer reliable strength and are designed to maintain their integrity, while the nylon brushes effectively scrub sensitive parts without causing damage. This thoughtful material selection provides a consistent and dependable cleaning experience through repeated use on various projects.
Reinstall Carburetor With Correct Bolts and Bowl Insert
First, confirm that the carburetor model matches the engine’s OEM number and VIN, then lay out all gaskets, seals, and bolts so nothing is missing. Clean the intake manifold surface, then install the rubber gasket on the carburetor body before placing the fuel bowl. Position the fiber washer, secure the bowl with the correct nut, and insert the hinge and center pins to lock the float assembly. Reassemble float assembly by seating the inlet needle seat groove‑down, attaching the inlet needle, and confirming smooth movement. Align the carburetor’s beveled edge with the intake pipe, line up the throttle valve cover and idle screw, and tighten the mounting bolts with a 10 mm ratchet. Finally, check for air leaks around gaskets and bolts before testing the engine. Loosen the air boot clamp on the carburetor to ensure proper alignment. The carburetor is typically mounted near the engine’s side or rear, attached to the intake manifold and fuel line. Intake manifold location is easy to locate once you remove the engine cover.
Inspect and Replace Drive Belt & Self‑Propel Cable
After confirming the carburetor is correctly reinstalled, turn your attention to the drive belt and self‑propel cable, because both components directly affect power transmission and maneuverability. First, disconnect the spark plug and raise the mower on ramps. Perform a vibration analysis while the engine idles; excess vibration often points to pulley misalignment or a loose belt. Inspect the belt for cracks, glazing, or flat spots, and examine each pulley for wobble. If any defect appears, release the tensioner, note the routing, and replace the belt, ensuring the pulleys are aligned perfectly. Next, remove the handlebar cover, pull the old cable from its guides, and install a new one with a slight flex but no sag. Adjust tension, lubricate, and verify smooth engagement. Regular maintenance of the belt and cable can prevent premature wear and ensure reliable operation. Clean the deck before reassembly to remove any grass clippings that could interfere with belt tracking.

Replaces OEM Part: Cub Cadet, MTD 954-0467A, 754-0467, 754-0467A, 954-0467, 490-501-F035, 490-501-Y035, 490-501-M035, CMXGZAM501035; Toro 112-0301

Replaces OEM Part: Craftsman 144959, 532144959, 24690, Husqvarna 144959, 532144959, 144959D, 532 14 49-59, 531300766, Ariens 21547027, 21547082, 21547188

Replaces OEM Part: Toro 119-8820, Exmark 119-8820-SL Deck Belt for 50-Inch Mower Decks
Fix the Recoil Starter and Swap Out Bad Springs
Ever wondered why your mower’s recoil feels limp or won’t snap back? Start with a recoil housing inspection. Lay the mower flat, remove the three Phillips screws from the engine cover, and lift it to expose the starter assembly. Loosen the fuel line hose clamp, pull off the carburetor, and plug the line if fuel is present. Press the plastic clips, lift the tank, and detach it from the starter. Unscrew the housing cap, untie the rope knot, and slide the rope out. Examine the starter pulley for wear; apply a thin layer of lubrication if it spins freely. Replace any broken spring, re‑tension by winding the pulley opposite the rope’s return, and hold tension with a screwdriver during reassembly. Re‑thread the rope, tie an overhand knot, glue if desired, and verify smooth rotation before reinstalling the tank, fuel line, and cover. Tighten the eight‑mm screws, align the tank slots, and test several pulls for normal recoil. Check the starter recoil to ensure it matches the specifications in the manual. Always wear protective gloves and eye protection while working on the mower. Safety precautions should never be overlooked when handling sharp tools or fuel lines. Proper blade height helps promote healthy grass growth and prevents scalping. Maintaining the correct blade angle ensures an even cut and prolongs blade life.

For Honda GX 120 GX 140 GX 160 GX 200 and Chinese 168FA 168FB 170F 5.5 HP 6.5 HP 7 HP gasoline engine, for John Deere 180A, 180B, 180C, 220A, 220B, 220C, 260B and 260C Lawn mowers.

Replacing OEM numbers : 262594,491889, which is a direct replacement for the old or broken one.

Genuine OEM Quality: This is a 695131 replacement recoil starter spring, designed specifically for Briggs & Stratton lawn mowers, including the 21000 series. As an OEM mower replacement spring it ensures smooth, reliable engagement of the recoil spring mechanism and helps maintain optimal engine performance
Test Run, Sharpen Blade, and Verify Cutting Performance
Usually you’ll begin the test run only after confirming fresh fuel, a clean spark plug, and an unrestricted air filter, then you can assess the mower’s startup, blade balance, and cutting performance in a single, systematic sequence. First, engage the flywheel brake, pull the starter cord, and listen for smooth engine rotation; any hesitation signals fuel or spark issues. Next, disconnect the spark plug wire, flip the mower, and remove grass buildup to check blade alignment and deck clearance. If the blade is misaligned or the deck is too low, adjust bolts until the blade spins freely without contacting the deck. Sharpen the blade using a file or grinder, maintaining a consistent edge angle, then rebalance it. Finally, reattach the blade securely, run the mower on a short strip, and verify uniform cuts, low vibration, and no smoke. Check the flywheel before starting the test run. If the starter cord is stuck, gently free it by releasing the jam with a pair of pliers before attempting to pull again. It’s also essential to verify the mower’s oil level is within the recommended range, typically between 0.5 and 1 quart for most residential models.