Call 811 three days before you start, wait for the color‑coded markings, and double‑check with a locator or pothole to avoid gas, electric, water, sewer, telecom, and cable lines. Dress in goggles, ear protection, sturdy boots, nitrile gloves, and long sleeves or chaps. Inspect the cutter for cracks, loose bolts, and blade wear; tighten everything and verify safety guards and emergency stops work. Run a short test strip, adjust the blade depth to 1.5‑3 inches, lock the lever, and keep the cutter dry. Use a taut string or painted line as a guide, cut straight strips, and stay steady. If you keep going, you’ll uncover more on slopes and cleanup.
Locate Underground Utilities Before Lawn Sod Cutting
Before you start cutting sod, you must locate any underground utilities on your property. Call 811 at least three business days before you begin, even for a small lawn project, to meet permit requirements and avoid legal penalties. Submit your request online or by phone, then wait for technicians to place color‑coded paint or flags. Verify those markings before you dig; double‑check that all lines—gas, electric, water, sewer, telecom, and cable—are clearly indicated. If you own private sprinkler or gas lines, use your plans, a cable locator, or potholing to confirm their paths. Remember, erosion can shift lines, so a fresh locate may be needed for each new cut. This markings verification step protects you from costly strikes and delays. Electromagnetic induction can be used to locate metallic utilities before cutting sod. Properly installing a sprinkler head requires pressure regulation to ensure uniform water distribution. Understanding soil compaction helps you decide whether aeration or tilling is needed after sod removal. Consider using a hand aerator to improve soil drainage after the sod is removed.
Wear Safety Gear for Lawn Sod Cutting
When you step onto the lawn with a sod cutter, you’ll need proper safety gear to keep yourself out of harm’s way. Slip on safety goggles or a full‑face shield to block flying debris; they’re the number‑one rule for any lawn equipment. Wear ear plugs or muffs to protect your hearing from the cutter’s roar, and choose sturdy, close‑toed work boots that guard your feet and ankles. Put on durable gloves—nitrile or rubber—to improve grip and prevent cuts. Dress in long pants and sleeves, or chaps, to shield skin from shards and keep fabric from catching. Follow local regulations to ensure compliance and avoid hazards. After each job, inspect gear for wear, perform proper maintenance, and store items in a secure, dry location to ascertain they’re ready for the next cut. Remember that using a sod cutter can generate soil displacement which may affect nearby plants if not managed properly. Never start the cutter without first confirming the blade is securely fastened. Always keep a fire extinguisher nearby in case of engine sparks.
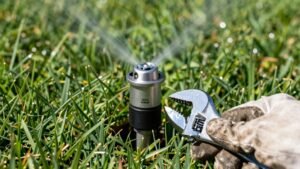
Inspect and Set Up Your Sod Cutter
Even if you’ve already geared up, you still need to give the cutter a quick once‑over before you start cutting. First, walk the machine and look for any cracks, leaks, or loose bolts; tighten fasteners, belts, and cables. Verify that all guards are secure and safety decals, emergency stops, and switches work. Check blade sharpness, cracks, and proper sod cutter alignment; replace or sharpen damaged blades. Perform routine maintenance checks on the engine: inspect fuel lines, guarantee the oil level is between the dipstick marks, and confirm the choke and throttle operate smoothly. Test tire pressure against the manufacturer’s recommendation, and make sure the handle is adjusted for comfortable balance. Finally, clear the work area of debris, mark underground utilities, and moisten the soil to aid blade penetration. Remember to engage the emergency stop before any adjustments to prevent accidental startup. Also, verify that the mower’s lift points are accessible and undamaged before attempting any lifting procedures. Following the user manual ensures you never miss a critical safety step.
Test Cut and Adjust Blade Depth for Clean Strips
After you’ve inspected and set up the cutter, run a short test strip—about three to four feet—to confirm the blade’s depth and evenness before tackling the whole area. As you drive the cutter forward, watch the blade glide smoothly; it should cut 1.5‑3 inches deep without gouging or leaving roots. If the strip looks uneven or the grass isn’t fully severed, stop, disengage the wheel drive, and adjust the depth knob and lever until you hit a clean cut. Lock the lever with the secondary green handle, then repeat the test. This quick check helps you avoid soil compaction concerns and supports topsoil preservation techniques by keeping the cut shallow enough to preserve valuable soil while still removing all grass and roots. Ensure the area is clear of pets or people before testing. Avoid operating the cutter in wet conditions to prevent electrical hazards and engine damage. Mowing in the rain can increase slip risk and damage equipment, so it’s best to wait for dry ground before proceeding. Remember to shut off the water supply before beginning any maintenance to ensure the system is fully depressurized.
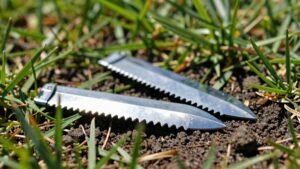
Cut Straight Sod Strips for Lawn Sod Cutting
If you want perfectly straight sod strips, start by establishing a clear guide—whether it’s a taut string, a painted line, or a tape‑measure edge—then follow that line with your cutter, keeping the blade at a consistent depth and moving steadily to produce uniform, clean cuts. For straight edge installation, drive stakes at the line’s ends, pull a tight string, and lay sod just beyond it before cutting with a sharp machete. Alternatively, paint a visible line after it dries, or stretch a tape measure along the desired path. Keep the cutter at a 6‑inch maximum depth, advance it slowly, and lift the handle at each strip’s end. This technique yields consistent sod thickness and clean, parallel strips ready for transport. Use a machete to cut the sod along the string line for a perfectly straight edge. Maintaining a steady stance helps you control the cutter’s pressure and direction for professional‑grade results. Remember to wear protective gloves to prevent blisters and improve grip while handling the cutter.
Cut on Slopes Safely for Lawn Sod Cutting
Straight‑line cuts work on flat ground, but once you move onto a slope you must adjust your approach to stay safe and keep the cutter under control. First, do a soil moisture evaluation; soggy ground can slip, while dry soil may cause the blade to dig in too deep. Then set your incline angle adjustment to a 45‑degree path, moving slowly and gradually. Keep the machine’s wheel drive disengaged when you stop, and always turn downhill, not uphill. Scan the slope for rocks, roots, or hidden wires before you start, and avoid any steep sections that feel unstable. Wear safety shoes, gloves, and eye protection, and keep by away from the blade. Stop the cutter whenever you pause, and park on level ground before any adjustments. Proper aeration improves root growth and helps the lawn recover faster after cutting. Regular aeration enhances soil health by reducing compaction and improving water infiltration. Regular aeration also boosts nutrient absorption for a healthier lawn.
Clean Up After Lawn Sod Cutting
Even when the sod’s been lifted, the yard still needs a quick, thorough cleanup. First, rake the clippings into a corner, then pack them into bags or containers for easy transport. Use a lawn sweeper if you have one; it gathers debris with minimal effort and reduces manual labor. Next, hose hard surfaces—patios, walkways, and the garage sidewalls—to flush remaining grass and prevent buildup. Edge any overgrown lines with an edger to restore neat boundaries. After debris is collected, compost the organic material or dispose waste material responsibly to minimize environmental impact. Finally, amend the exposed soil with a 2‑3 inch compost layer, till it in, and level the area for the next planting phase. Ensure the soil is evenly graded to promote proper drainage. Proper aeration can also improve root oxygen and enhance nutrient uptake. A well‑used roller can evenly distribute weight across the lawn, helping to eliminate bumps and improve seed contact. Consistent moisture after aeration supports deeper root growth and faster seed germination.