Start by inspecting the lawn edge for overgrown grass, weeds, or compaction, then loosen the soil with a garden fork and mark the target height. Choose an edger that matches your yard size and power preference, install the appropriate blade, and set the depth to about 0.5–1 inch below the surface. Adopt a shoulder‑width stance, grip the handles firmly, and keep the blade at a 90‑degree angle, moving slowly along a string guide for straight lines or a flexible hose for curves. Adjust wheel pressure and maintain the blade, and you’ll achieve crisp, consistent edges while staying safe. Continue for deeper tips on fine‑tuning and maintenance.
Inspect Lawn Edges and Loosen Soil
First, give the lawn edge a thorough visual inspection: walk the perimeter, note any overgrown grass, uneven lines, invasive weeds, or winter‑damage on borders, and check the edger’s blade for dullness. Then, identify desired edge height by comparing the current line to your design spec; mark the target with a short stake or paint. Next, evaluate soil quality: probe with a trowel, feel for compaction, and look for clods or debris. If soil is compacted, loosen it with a garden fork or spade, working just beyond the marked line to avoid damaging the bed. Remove loose clumps, rake the trench clean, and discard excess material. This prepares a stable, even foundation for precise edging while preventing injury from hidden obstacles. Perform edging after a rainstorm when the soil is damp to keep it together. Consistent pressure and a proper blade angle are essential for a clean cut, especially when working around root systems.
Select and Set Up the Ideal Lawn Edger
After inspecting and loosening the soil, you’ll need to pick an edger that matches your yard’s size, terrain, and power preferences, then configure it for safe, precise operation. First, assess yard size: small lawns work with manual or basic electric units; medium lawns benefit from corded or cordless electric edgers; large lawns demand gas‑powered models. Choose power source based on noise tolerance and maintenance limits—electric for quieter, low‑maintenance suburban use. Next, conduct blade technology selection: flat blades for straight concrete edges, serrated blades for tough grass and roots, hardened steel blades at least 4 mm thick for durability. Install the blade, then set edge depth adjustment using the wheel or lever, targeting 1.5–8 inches to suit terrain. Verify secure handle grip, confirm battery or fuel levels, and test the cut on a small section before full operation. For a seamless transition, consider adjusting the trimmer’s head to mimic an edger’s angle and depth. Understanding the performance trade‑offs between trimmers and edgers helps you select the most efficient tool for your lawn’s specific needs. Selecting the appropriate cutting width ensures consistent edges across varied grass densities.
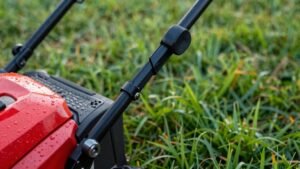
Adopt the Correct Stance, Grip, and Blade Position
A solid stance begins with your feet shoulder‑width apart on firm ground, engaging your core to stay balanced as you stride slowly forward. Keep your posture upright, knees slightly bent, and weight centered over the edger. Grip the handles with a stabilizing tool grip: left hand on the main handle, right hand near the hip, both firm but not strained. Position the blade so it meets the lawn edge at a 90‑degree angle, just barely scraping the sidewalk without contacting concrete. If the model offers an adjustable blade angle, fine‑tune it for angled cuts before you start. Keep your arms straight, guide the machine with deliberate, slow movements, and walk at a comfortable pace while the weight of the edger does the work. This procedural setup maximizes control, reduces fatigue, and maintains safety. Check blade guard before each use to ensure it is intact and properly secured. Using a bench grinder can quickly restore a dull blade to a sharp edge, but be sure to maintain the correct bevel angle while you work. A clean cut promotes healthier grass growth and reduces weed seed spread. Securely clamp the blade in a bench vise before sharpening to prevent movement and ensure a consistent edge.
Step‑by‑Step Edging for Straight Lines and Curves
Set up a clear guide before you start edging, then follow it step‑by‑step to keep the blade on track. For straight lines, stretch a garden string taut between stakes, align it at the exact cut point, and insert fork tines each side to lock it. Mow the lawn to 2.5 inches, then walk slowly, keeping the edger blade perpendicular and guiding it along the string or path edge. Maintain a steady pace; let the tool do the work. For curves, lay a hose or flexible string, adjust until the shape looks right, and follow it with small, overlapping strokes. Reduce speed near flower beds, and use a string trimmer upright for maintenance. Apply edge maintenance strategies consistently; this yields achieving crisp edges while protecting yourself and the turf. Use a stick edger to achieve a 90‑degree angle cut on hard surface areas. Remember to check the mower’s blade sharpness before each session to ensure clean cuts. Sharpening blades once a season helps maintain optimal cutting performance. Sharp blades reduce the effort needed and prevent tearing of the grass.
Fine‑Tune Blade Depth and Maintain Your Lawn Edger
Most lawn edgers work best when the blade sits just a half‑inch to an inch below the surface, so start by loosening the lock nut, shifting the guide wheel to the desired depth, and retightening the nut securely. Then, adjust the wheel so the blade breaks ground by a quarter inch; this setting optimizes cutting performance while preserving blade condition. Wear safety glasses and gloves, and guarantee the ground is dry to reduce dust. While edging, raise or lower the arms to compensate for uneven spots without stopping, keeping the wheel barely touching the lawn. After each session, inspect the wheel and lock nut for wear, tighten any loosened components, and clean debris. Regularly check blade sharpness; a dull blade compromises precision and increases effort. Locking the wheel in the desired position secures the blade depth setting. Properly leveled mower decks contribute to consistent cut quality and extend the life of your equipment.