First, turn off the zone’s valve and dig a 6‑8‑inch hole down to the riser, exposing the 1/2‑inch female inlet. Unscrew the faulty head counter‑clockwise, inspect the filter and riser for leaks, then clean the threads and wrap three to five clockwise turns of Teflon tape. Hand‑tighten the new head, give it a quarter‑turn, and verify it’s flush with the soil. Test for leaks, adjust the spray radius, and backfill tightly; the next steps will show you how to fine‑tune the pattern and confirm pressure.
Identify the Sprinkler Head & Gather Tools
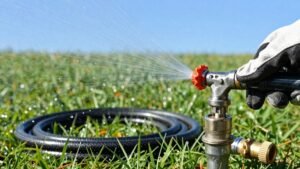
Start by pulling the sprinkler head out of the ground so you can see its type, riser height, and nozzle markings. You’ll then perform head identification: note the 1/2‑inch female inlet, measure the riser (2‑inch, 3‑inch, 4‑inch, 6‑inch, or 12‑inch), and record the nozzle color or “8 VAN” label that indicates spray distance. Check the spring tension with a flat‑head screwdriver; this confirms the body’s compatibility with replacement parts. Gather a ruler, the screwdriver, and a set of matching nozzles. Verify pressure considerations by confirming the nozzle’s rated range (15‑70 PSI, typically 30 PSI for consistent flow). Guarantee the inlet thread matches the new head before proceeding to replacement. Pop‑up heads are interchangeable, allowing you to switch to a different spray distance or pattern as needed. Birds often favor lawn grass seed, so consider using seed‑resistant grass to reduce bird damage while maintaining a healthy lawn. Implementing reflective tape can deter birds from the newly seeded areas. Depressurizing the system before removal prevents accidental spray and protects the surrounding grass.
Shut Off Water and Dig a Minimal Hole for the Pop‑Up Sprinkler
After identifying the head and gathering tools, shut off the water before you dig. Locate the gate valve in the nearest valve box and turn it 90° clockwise, or use the double‑check valve handle for a complete shutoff. If the system has a backflow preventer, turn both handles 45° to half‑open, then close the sprinkler shut‑off lever perpendicular to the pipe. Verify the cut‑off by checking pressure; this helps you troubleshoot water issues before removal. Dig a 6‑8 inch diameter hole with a hand trowel, 4‑6 inches deep, just enough to expose the riser pipe without disturbing surrounding turf. Clear soil carefully, exposing the sprinkler body while preserving lateral lines. This minimal excavation also lets you perform winterization steps efficiently. Ensure the backflow preventer is fully drained to avoid freeze damage. Wear protective gloves to prevent cuts while handling sharp sprinkler components. *Also, relief pressure can be released by opening a nearby valve before removal.* Properly aligning the deck level ensures consistent water distribution across the lawn.
Unscrew the Faulty Pop‑Up Sprinkler Head Safely
If the water’s off and the riser is exposed, grip the sprinkler head firmly with your fingers and turn it counter‑clockwise using a sprinkler adjustment tool or by hand, applying just enough torque to loosen the threads without stripping them. Once the head separates, hold it steady with your fingers while you spin the top off to reveal the internal cavity. Perform a quick filter inspection; pull the filter out with thumb pressure and discard it if clogged or damaged. Conduct a body inspection of the detached head, checking for cracks, worn seals, or stripped threads that could affect re‑installation. Apply minimal torque throughout to protect the riser, and avoid excessive force that could strip threads or break the riser assembly. Use flags to mark all sprinklers in the yard before starting the replacement. Ensure the trench depth matches the recommended sprinkler head depth for optimal water distribution. Verify that the new head’s flow rate matches the zone’s design specifications to maintain balanced irrigation. Properly adjusting the sprinkler spray pattern helps achieve uniform coverage across the lawn.
Inspect the Riser to Determine If a Guts‑Only Swap Is Sufficient
Before you decide whether a full head replacement is necessary, give the riser a thorough visual and functional inspection to see if a guts‑only swap will suffice. Inspect riser components for leaks, corrosion, or damage; verify that the assembly sits unobstructed and that all surfaces are clean of dust and debris. Check tamper seals for integrity and confirm backup heads are present. Assess control valve condition by exercising the butterfly valve, listening for tamper‑switch activation, and looking for OS&Y stem indicators. Guarantee the valve shows no corrosion, leaks, or obstruction, and that redundancy valves are installed. Finally, read pressure gauges at the main drain and control valve, compare readings, and confirm adequate supply pressure before deciding on a guts‑only swap. Gauge reading slightly above 50 psi indicates the system is pressurized and ready for testing. A common cause of rotation failure is loose fittings. Properly tightening the sprinkler head can prevent future misalignment and ensure consistent water distribution.
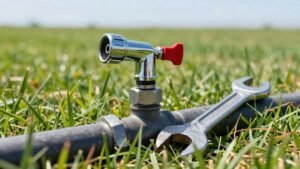
Install the New Head – Tape the Threads, Set the Height, and Tighten
Thread preparation and height adjustment are the first critical steps when installing a new pop‑up sprinkler head. Clean the threads on the male end of the head, then wrap three to five turns of Teflon tape clockwise, matching the tightening direction. Avoid excessive taping; too much tape narrows the flow path. Align the riser height with the trench depth—typically 6‑8 inches—and guarantee the top of the head sits flush with the soil surface. Screw the head onto the riser by hand until snug, then give a quarter‑turn with a wrench if needed, protecting the pipe from damage. Verify vertical alignment, pack soil tightly around the base, and confirm the head is level before moving to the next step. Use a stainless steel locking clamp to secure the connection and prevent leaks. Always check for leak‑free operation after installation to ensure proper function. Proper spray radius measurement helps confirm the head will cover the intended area without gaps.
Test for Leaks, Proper Rotation, and Even Water Distribution
When you finish installing the new head, immediately test for leaks, verify proper rotation, and affirm even water distribution. Turn on the zone for two minutes, then read the water meter for unexpected flow and listen for running water. Inspect the ground for wet spots, pooling, or bubbling, which signal a test for line leaks. Examine the head’s top for gurgling or water escaping the rubber seal, and guarantee the check‑valve washer holds. Observe the spray pattern; the head must rotate fully and land at the intended radius. Walk the lawn while the system runs, noting under‑coverage, overspray, or misting to monitor water distribution efficiency. Record start/stop times and compare them with usage data to confirm consistent performance across the zone. Check the low‑flow indicator after shutting off the main sprinkler valve to confirm the leak is not in the main line. Properly adjusting the sprinkler head’s arc and radius ensures uniform coverage across the entire lawn. Adjusting the head’s throw radius helps prevent dry spots and overspray. Align the adjustment screw according to the manufacturer’s guidelines to set the correct spray radius for optimal coverage.
Fine‑Tune Spray Pattern and Height for Uniform Coverage
Three key steps—adjusting the spray arc, setting the radius, and confirming the nozzle’s vertical height—ensure uniform coverage. First, rotate the nozzle until the indicator bump aligns with the desired right boundary, then twist counter‑clockwise to the left edge; this optimizes nozzle rotation for precise arc control. Next, use the central screw or top‑adjustment screw to reduce the spray distance, turning clockwise to shrink the radius and clockwise to enlarge it, thereby maximizing spray radius while preventing overspray on structures. Finally, verify the head’s vertical height: the stem should sit level with the lawn surface, allowing the water to exit at the correct elevation for even distribution. Observe the pattern with water flowing, adjust as needed, and confirm overlapping coverage across adjacent heads. The radius adjustment screw can be turned while the sprinkler is running to fine‑tune spray distance without stopping the system. Also, remember to shut off water pressure before beginning any adjustments to prevent accidental spray and protect the system. Proper water pressure testing helps ensure consistent flow across all heads. Regularly check the spray pattern to confirm that adjustments maintain the intended coverage throughout the season.
Backfill, Re‑sod, and Verify System Pressure After the Repair
After you’ve reinstalled the sprinkler head, backfill the trench with the original soil, tamp it gently but firmly, and replace the displaced sod so the head sits flush with the lawn surface. Apply even soil compaction in 1‑2 inch layers, avoiding over‑tamping that could stress PVC joints. Guarantee the sod aligns with surrounding turf for seamless aesthetic restoration. Once backfilled, turn on the pump briefly to flush the line, clearing sand and debris. Shut the system, then conduct pressure testing: observe head rotation, verify uniform spray, and inspect for leaks at threaded connections. If leaks appear, re‑apply Teflon tape and retest. Confirm that pressure matches zone specifications before finalizing the repair. Flush the plumbing before reinstalling to remove any debris that could clog the new head. Properly set the spray distance to match the coverage area for optimal water efficiency.