Grab ½‑ or ¾‑inch PVC, 5‑inch base sections, elbows, tees, and pop‑up heads; also get a 24 V smart controller, low‑voltage cable, and a valve box. Sketch your yard, measure dimensions, and map zones, then mark trench lines 6‑12 in deep. Dig a hole for the manifold, lay gravel, set the box, and run schedule‑40 pipe with the appropriate fittings. Attach flexible tubing to each pop‑up, wire the controller, and configure zones. Flush, test each zone, adjust spray arcs, and backfill in layers—keep reading for detailed tuning tips.
Gather Materials and Tools for a DIY Sprinkler System
Before you start digging, gather every pipe, fitting, head, and tool you’ll need so the installation runs smoothly. Pick ½‑inch or ¾‑inch PVC for mains and risers, then cut 5‑inch sections for base structures and 8‑inch pieces with caps for side‑foot supports. Stock 4‑inch intermediate connectors and 2‑inch links to attach tees to risers. Choose durable fittings: T‑ees for head attachments, 4‑way crosses for multi‑head assemblies, 45‑degree elbows for smooth turns, and 1‑inch male‑to‑female adapters. Include compression end caps for zone terminations. Assemble pop‑up or gear‑drive heads, 24‑inch risers, and flexible funny or swing pipes. Add polyethylene tubing, underground flex pipe, and rubber hose for valve feeds. Keep a pipe cutter, shovel, hammer drill, screwdrivers, pliers, plumber’s tape, primer, and glue handy, and remember to monitor sprinkler performance during setup. Ensure proper water pressure is achieved by testing a 5‑gallon bucket fill in 45 seconds. Properly calculate head spacing to match your zone’s coverage area and flow requirements. Check for loose fittings regularly to prevent head rotation issues. Apply the weed killer during optimal growth stage for best results.
Plan Your DIY Sprinkler System Layout and Zones
Now that you’ve got every pipe, fitting, and tool ready, sketch a precise site plan to map out your sprinkler layout and zones. Measure yard dimensions on graph paper or with an online tool, noting sidewalks, patios, and buildings to avoid obstacles. Mark sun‑exposed and shaded areas to guide zone divisions. Record PSI and GPM using a pressure gauge; this data drives head placement optimization and water pressure management. Choose pipe diameters that sustain required flow, keeping each zone’s total GPM below 7.2. Plot sprinkler heads at corner points, applying triangular or square head‑to‑head spacing (≤120 % of throw radius). Label each zone on the plan with a valve indicator, ensuring consistent spray patterns and preventing dry patches. Confirm soil type with a squeeze test to adjust irrigation rates for the specific soil composition. Incorporate a water‑saving schedule to align watering times with local climate patterns and reduce waste. Properly orbit sprinkler heads will provide uniform coverage and prevent over‑watering. Adjusting the sprinkler head height can improve coverage by optimizing spray radius.
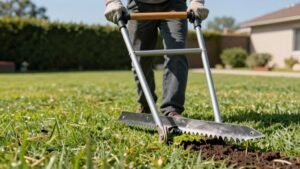
Dig Trenches and Install the Valve Box
If you position the valve box close to the main water source and centrally within the yard, you’ll minimize pipe length, pressure loss, and future maintenance hassle. First, mark the trench line with string or spray paint, ensuring it avoids high‑traffic walkways and dense root zones. Dig a trench 6‑12 inches deep, then excavate a hole about 18 inches deep and wide enough for the box plus working space. Lay 2‑3 inches of gravel at the bottom for drainage, then place the valve manifold on the gravel and set the box level with the soil surface. Secure the main supply to the manifold, tighten clamps, and verify the lid sits flush. Locate valve box centrally and avoid damage to landscaping by keeping the trench clear of existing plants. Hand digging is required because a trenching machine cannot be used due to the presence of electrical and irrigation wires. Remember to shut off the water before starting any excavation to prevent accidental pressure release. Properly adjust spray pattern to match plant spacing and water requirements for optimal coverage. Adjusting the sprinkler head ensures uniform water distribution across the lawn.
Lay PVC Pipe and Connect Pop‑Up Sprinklers
Lay the PVC pipe along each trench according to the irrigation plan, cutting sections with a pipe cutter and cleaning the ends before priming and cementing them together. Fit schedule‑40 pipe into the main line, using couplings and 90‑degree elbows where the trench changes direction. Insert tee fittings at every branch point, prime and cement them, then attach short flexible tubing with barbed or HSBE fittings. Push the barbed end fully into each pop‑up sprinkler’s inlet, ensuring the joint faces upward for easy maintenance. Adjust cover angle on the sprinkler heads to match the intended spray pattern, and verify sprinkler head spacing matches the design layout. Tighten all connections, then flush the system to confirm there are no leaks before final placement of the pop‑up heads. Ensure head‑to‑head coverage is achieved to prevent dry spots. Turn off the water before beginning any removal or installation work. Before starting, wear protective gloves to prevent injuries while handling sharp tools and cement. Consider installing a pressure regulator to maintain consistent water flow and protect the system from high‑pressure damage.
Hook Up 24‑V Wiring and Install the Smart Controller
The smart controller and its 24‑V wiring are installed after the trench work is complete, so you can focus on electrical connections without disturbing the pipe layout. Mount the controller in a weather‑proof box 4‑5 feet above ground, preferably near the main water line and a GFCI‑protected 120 V outlet. Plug a 40‑100 W transformer into the outlet, then run 18‑22 AWG low‑voltage cable from the transformer’s secondary terminals to the controller’s 24‑V input, using waterproof wire nuts or crimp connectors. For runs over 100 feet, upgrade to a heavier gauge to meet transformer power requirements and avoid voltage drop. Secure the cable in conduit at least 6 inches deep, keep bends larger than 4 inches, and separate from power or gas lines per code. Verify all connections, then power up the controller and configure zones via the app. Properly off water pressure before detaching any sprinkler head to prevent leaks and maintain consistent irrigation patterns. Adjusting the spray arc and distance of each pop‑up head ensures wet coverage and eliminates dry spots across your lawn. Follow the torque specifications for reinstalling heads to avoid overtightening and damage.
Test Coverage, Adjust Heads, and Backfill Your DIY Sprinkler System
After you’ve finished installing and wiring the controller, it’s time to verify that every head delivers water evenly, adjust any misbehaving units, and backfill the trenches without disturbing the layout. First, inspect for issues by placing three identical cans at varied distances within each spray pattern. Run the zone for 15 minutes, then measure water depth in each can; note differences to assess uniformity. Combine the three readings, divide by three, and verify flow and pressure against manufacturer specs. If coverage is uneven, clean clogged heads, re‑align them plumb, and replace renozzles as needed. Once heads are calibrated, backfill in 2‑inch layers, compact gently, and slope slightly for drainage. Test each zone after partial backfill to confirm no shifts before final cover. For precise adjustments, locate the spray‑pattern screw and set the desired radius and angle. Ensure the spray radius matches the lawn’s dimensions for optimal coverage.