Turn off the water, locate the head with a metal detector or by spraying the zone, and dig a shallow 8‑12‑inch trench to expose the riser. Measure the lift you need, then cut a rigid riser or attach a flexible swing‑pipe to the T‑fitting, screwing the sprinkler head back on at the new height. Backfill, soil, pack firmly, and test the spray pattern for even coverage. Adjust as needed, and the next sections will show you how to fine‑tune the system and avoid common leaks.
Why Raising Your Sprinkler Head Improves Lawn Health
Raising your sprinkler head to the proper height guarantees water spreads evenly across the lawn, eliminating dry spots and overwatered patches. When the head sits at the correct elevation, rotary streams reach taller plants and ground cover without creating low‑head “crop circles,” delivering the Benefits of even water distribution. This uniform coverage confirms the Advantages of consistent lawn hydration, so every zone receives the same moisture volume, preventing puddling and runoff. Steady, deep penetration promotes root development, allowing nutrients to soak in and strengthening drought resistance. Controlled delivery also reduces leaf wetness, curbing fungal disease risk. Ultimately, balanced hydration yields a lush, uniform appearance while conserving water and minimizing waste. Proper nozzle selection ensures each head delivers the optimal spray pattern for its zone. Proper pipe sizing is essential to maintain adequate pressure throughout the system. Adjusting the spray radius can be done with a simple adjustment screw on the head.
Essential Tools and Materials for a DIY Raise
What tools do you need to raise a sprinkler head yourself? Start with a small shovel or trowel to expose the line and create a 6‑inch diameter hole; a hand shovel lifts sod cleanly for repositioning. Choose an adjustable wrench and a pair of pliers—rainbird pliers for nozzles, standard pliers for stubborn heads—to tighten and unscrew components. Use a stiff brush and damp rag to clear soil, and pruning shears for precise grass trimming. Measure raise height with a tape measure, verify vertical alignment with a level, and cut riser extensions to exact length using a sharp knife or shears. Select extension risers, tapered cutoff risers, or snap‑on Kap‑IT risers, and seal connections with thread seal tape. Effective tool selection and proper tool maintenance keep the process efficient and reliable. Capit’s cap extender allows a quick, tool‑free lift of up to three inches. Follow the step‑by‑step guide to ensure each phase is completed correctly. Remember to turn off the water before starting to avoid pressure buildup.
How to Dig and Expose the Sprinkler Head Safely
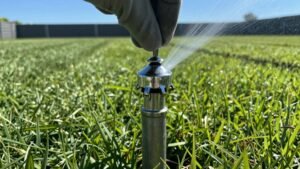
After gathering the shovel, wrench, and seal tape, you’ll need to locate the sprinkler head precisely before you start digging. Turn on the irrigation system, watch for wet spots, and mark the spot with a landscape flag. Use a metal detector to confirm the exact position, then draw a string line or spray‑paint the pipe path to define a precise excavation location. Dig a controlled 8‑12‑inch trench with a shovel, keeping the width narrow to limit exposure of surrounding lines. Stop before you encounter the riser, and check for upstream pipes to avoid unintended line damage. Clear soil around the head, inspect fittings, and verify accessibility before proceeding to the next step. Brand‑specific caps are not interchangeable, so be sure to use the correct cap for the sprinkler model you are working on. Properly adjusting the head’s arc setting ensures uniform water distribution and prevents dry spots. Accurate pressure measurement helps determine the correct spray radius for optimal coverage. Water pressure must be reduced to a safe level before any disassembly to prevent accidental spray.
Adjusting or Replacing the Riser to Reach the Desired Height
One or two inches of excess height can make a big difference in spray coverage, so you’ll need to decide whether a flexible swing‑pipe riser will suffice or if a rigid cutoff riser must be installed. First, measure the raise needed; if it exceeds ½ inch, opt for a cutoff riser. Dig a 6‑8‑inch trench with a hand shovel, clear soil from fittings using a stiff brush and damp rag, and unscrew the old head with pliers if necessary. For a rigid riser, cut it to length with a cutoff riser tool, ensuring enough threaded sections for the T fitting and head. Screw the riser into the T fitting by hand, then attach the sprinkler head, checking vertical alignment and proper riser selection. Tighten connections, test for leaks, refill soil, and pack firmly to maintain sprinkler head alignment. Turf growth can cause the head to become sunken over time. Adjusting the spray radius can further improve coverage uniformity. Check for debris buildup in the head’s moving parts to prevent rotation issues. Properly turn off the water before starting any adjustments to avoid accidental flooding.
Quick‑Fix No‑Dig Riser Kits: When and How to Use Them
If a pop‑up sprinkler head has sunk into the grass or soil, a Quick‑Fix No‑Dig Riser Kit lets you raise it in minutes without excavation. Choose the Kap‑It Riser when you need a 1‑½‑inch lift; it snaps onto Hunter and Rainbird spray bodies, so you avoid sprinkler compatibility issues with Toro or Irritrol models. Unscrew the nozzle, thread the stem extender, then slide the cap extender and snap it down. Stack two extenders for up to three inches if the head is deeply buried. The polymer construction addresses material durability concerns, resisting UV and corrosion while protecting the original canister. Installation takes three to five minutes per head, restores proper water distribution, and eliminates the need for back‑filling or extensive excavation. Cap It kits are inexpensive, typically costing around $10 per bag, making them a cost‑effective solution for many homeowners. Remember to shut off the main water supply before starting any adjustments. Proper torque during reinstallation helps maintain even water pressure across the lawn. Even coverage can be verified by checking for dry spots after a test run.
Backfilling, Leveling, and Testing the Adjusted Sprinkler
When you finish raising the sprinkler head, backfill the excavated soil tightly around it, then level the surface so the head sits flush with the surrounding lawn. Pack the soil in 2‑inch layers, tamp each layer lightly to achieve adequate soil compaction impact without sealing drainage pathways. Restore displaced grass to maintain a uniform backfilled appearance and prevent erosion. Verify the head remains vertical and level before the final layer. Turn on the water supply, observe the spray arc, and confirm the pattern meets coverage requirements. Adjust the arc or radius as needed, then retest until the spray reaches adjacent heads without pooling. Document the final position and any fine‑tuning for future maintenance. Use channel locks to hold the pop‑up sprinkler head while you work. Check the sprinkler head for consistent pressure across the entire lawn. Proper water conservation helps prevent over‑watering and promotes a healthier, more uniform lawn. Even cutting ensures consistent grass height across the yard.
Common Leaks and Height Issues – Troubleshooting Tips
Spotting a leak or uneven spray usually means a seal, head, or pressure problem, so start by inspecting the sprinkler’s rubber seals, diaphragm, and nozzle for cracks, wear, or debris. If you find cracked heads, replace them; brittle plastic will crack under UV and freeze‑thaw cycles, causing water to pool at the base. Examine each zone for multiple leaky zones—this often signals a worn valve diaphragm or a pressure imbalance that forces water through every head. Clear debris from nozzles and filters with a brush or toothpick; clogged components prevent seals from closing and create slow drips. Check that heads sit level; tilted or misaligned heads won’t seal, leading to constant seepage. Finally, verify water pressure imbalances with a gauge; high or fluctuating pressure accelerates component wear and produces simultaneous leaks across a zone. Shut off the sprinkler system shut‑off valve before inspecting for leaks.
Maintaining Proper Sprinkler Height for Ongoing Lawn Care
Maintaining the correct sprinkler height is essential for uniform water distribution and preventing lawn damage. You should first verify that the sprinkler head clears the grass by at least two inches; if not, adjust the riser until the head pops up above the current mow height. Use a small trowel to remove soil around the base, then lift the flexible riser by hand or cut a rigid riser to the required length—typically four inches for most lawns, three inches for a balanced approach. After tightening the connections, backfill with packed dirt, leveling it just below the head to achieve ideal sprinkler placement. Finally, practice proper grass height maintenance with regular mowing; this reduces the need for future height tweaks and keeps the spray pattern consistent. Shorter sprinklers clear lawn growth more effectively, reducing the need for frequent adjustments. Proper zone design also depends on the sprinkler head spacing to ensure even coverage across the lawn. Properly installing a pop‑up sprinkler head requires turning off water before digging the trench to avoid accidental spray. A faulty valve can cause water to leak even when the system is turned off.