First, measure your yard’s length and width, subtract any hard‑scape areas, and convert the net square footage to 1,000 sq ft units. Multiply that number by the recommended seeding rate—2–3 lb for Kentucky bluegrass, 8–10 lb for tall fescue or perennial ryegrass, 6–8 lb for fine fescue, 0.5–1 lb for creeping bentgrass, or 1–2 lb for bermudagrass. For overseeding, use roughly half those amounts. Add a 10–15 % safety margin for germination loss, then you’ll have the precise seed quantity; the next sections will show you how to fine‑tune the calculation for irregular shapes and spreader settings.
How to Use a Lawn Seed Calculator to Measure Your Yard
A lawn seed calculator lets you turn your yard’s dimensions into an exact seed quantity in seconds. First, measure your space: multiply length and width for rectangles, or use satellite‑imagery tools to draw polygons for irregular shapes. Subtract non‑lawn areas—paths, patios, or structures—to isolate the planting zone. When you input the resulting square footage, the calculator applies handling scale factors automatically, converting acres (43,560 ft²) or metric grids into the appropriate unit. Choose the “new lawn” or “overseeding” option, then select the recommended sowing rate (e.g., 25 g/m²). The tool references coverage tables, outputs the required kilograms or pounds, and adjusts for any custom rate you set. This precise workflow eliminates guesswork and guarantees you order the exact seed amount. Understanding seeding rate helps you fine‑tune quantities for different grass species and soil conditions. Proper soil preparation ensures the seed makes good contact and germinates uniformly. Planting depth should match the grass type, typically ¼‑½ inch for most cool‑season varieties.
Choose Grass Based on Climate, Soil & Germination Rate
After you’ve calculated the exact seed amount, the next step is matching the grass to your climate, soil, and germination characteristics. First, identify your region’s season length: cool‑season varieties (Kentucky bluegrass, fine fescue) thrive where the growing season stays between 65‑75 °F, while warm‑season types (Bermuda, Zoysia) need an 80‑95 °F window. Next, assess soil type and pH; tall fescue tolerates clay‑sandy loam, Bahiagrass prefers well‑drained sand, and Centipede tolerates poorer soils. Conduct thorough soil preparation—till to a depth of 4‑6 in, amend with compost, and level the surface. Finally, consider germination rate: perennial ryegrass offers rapid cover for cool‑season mixes, whereas warm‑season grasses often require sod or plug planting for reliable establishment. Choose the blend that aligns with your climate zone, soil condition, and desired season length. In the Southwest, where extreme temperatures are common, selecting drought‑tolerant varieties like Bermuda grass is essential. Proper soil testing ensures optimal nutrient balance before planting. Pre‑emergent products can inhibit seed germination if applied too early. For Bermuda grass, expect emergence within 7‑14 days under optimal warm conditions.
Seed Rates for New Lawns: Pounds per 1,000 sq ft
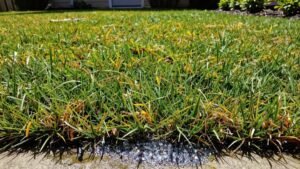
When you’re planning a new lawn, you’ll need to calculate the seed amount in pounds per 1,000 sq ft based on the specific grass species you choose. For cool‑season grasses, the best lawn seeding rates range from 2–3 lb for Kentucky bluegrass up to 8–10 lb for tall fescue or perennial ryegrass. Fine fescue sits at 6–8 lb, while creeping bentgrass needs only 0.5–1 lb. Warm‑season options differ: bermudagrass is 1–2 lb, and Bahia grass 5–10 lb. Multiply your usable lawn area (subtract patios, driveways, etc.) by the species‑specific rate, then divide by 1,000 to get the ideal seed amounts per project. Staying within these bounds avoids thin canopies, excessive cost, and unnecessary seed waste. Selecting the right seed also depends on your climate zone to ensure optimal germination and growth. Proper seed depth is crucial because most grasses germinate best when seeds are planted ¼‑½ inch deep. Using a seed spreader helps achieve an even distribution across the lawn.
Overseeding Rates: How Much Less Seed You Really Need?
Overseeding doesn’t require the full seed rate you’d use for a brand‑new lawn; you typically apply only half the normal amount, roughly 15–25 g per square meter, to let new seedlings integrate without overcrowding existing turf. Use the type‑specific guidelines—turf‑type tall fescue 4–6 lb/1,000 sq ft, Kentucky bluegrass 1–1.5 lb/1,000 sq ft, etc.—and halve them for overseeding. Adjust upward if the lawn is thin or has bare spots, but never exceed two‑thirds of the new‑lawn rate. Calibrate your spreader, then apply in two perpendicular passes at the reduced rate. This approach aids determining ideal overseeding interval and minimizes overseeding competition, ensuring uniform fill, efficient resource use, and cost‑effective results. For best germination, aim for a seed‑to‑soil ratio of about 1:10 by volume. Planting in the cool season maximizes germination success and reduces disease risk. Properly soil testing before overseeding ensures the pH and nutrient levels are optimal for seedling establishment.
Crunch the Numbers: Simple Seed‑Needed Formula
A quick way to estimate how much seed you’ll need is to apply the core seeding‑rate formula: (Plants per acre ÷ Seeds per lb) ÷ Germination × (1 + Mortality). First, determine seeds per pound by weighing a known count—100 seeds, for example—and using the conversion tables for ounces, grams, or grains. Plug the desired plants per acre, germination (as a decimal), and mortality into the equation to get pounds per acre. Then convert to a per‑square‑foot basis: divide the acre result by 43,560 sq ft, or multiply the area in thousands of square feet by the lbs per 1,000 sq ft rate. This lets you calculate seeding rate per square foot and accurately estimate seed required based on desired density, ensuring a precise, cost‑effective lawn. A close‑up photo of tiny oval seeds can help you verify the seed type you’re measuring. The presence of essential proteins in the seed supports robust early growth and disease resistance. Grass seeds are naturally produced through pollination and fertilization in mature grass plants.
Add a Safety Margin for Germination & Waste
About 15‑20 % extra seed usually covers the inevitable loss from declining germination and handling waste. You calculate the margin by first checking the seed test accuracy; a 90 % germination result means you’ll actually need roughly 1.1 × the base amount. Next, factor in the seed storage lifetime: if the seed is older than two years, add another 10‑15 % because viability drops to 70‑80 % and may fall below 60 % after three years. Combine both adjustments to reach a practical safety buffer of 20‑30 % total. Keep this buffer consistent across the entire lawn, but don’t exceed 40 % extra, as excess waste can cause uneven coverage and higher cost. This approach guarantees reliable establishment while accounting for inevitable loss. Store seed in a cool, dry environment to preserve viability. Dormant seeds can survive without water for several weeks to a few months, depending on type, soil conditions, temperature, and humidity.
Adjust Seed Amount for Irregular Shapes & Hardscape Features
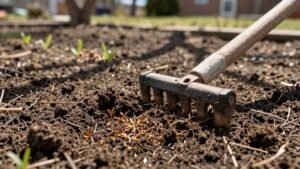
How do you accurately size a lawn that isn’t a simple rectangle? First, break the yard into manageable feature shapes—rectangles, triangles, or trapezoids—using a tape measure or digital mapping tool. Compute each shape’s area by multiplying its length by its width (or base by height for triangles), then sum the results to get the gross square footage. Next, measure every hardscape element—patios, driveways, walkways—and subtract their footprints from the gross total; this yields the net area for seeding. Apply the appropriate seed rate (2‑5 lb/1,000 sq ft for overseeding, 4‑8 lb/1,000 sq ft for new lawn) to the adjusted area. Use the formula (net sq ft ÷ 1,000) × seed rate, and round up to the nearest full bag. This precise area adjustments prevent waste and guarantee uniform coverage. A lawn roller helps flatten the soil before seeding. Proper soil testing ensures optimal pH and nutrient levels for seed germination. Adding a layer of quality topsoil enhances seed‑to‑soil contact and moisture retention, promoting vigorous root development.
Spread It Right: Easy Spreader Tips
When you set a broadcast spreader to 50 % output and walk at a steady 3.5 mph, the fan will cover roughly 75 % of its full arc—about nine feet for a twelve‑foot reach—so you can overlap each pass by that width to guarantee uniform seed distribution. Use proper spreader settings: start at one‑third of maximum opening, then adjust to 6.75 (Scotts EvenGreen) or 27 (Miracle‑Gro Rotary) for the target rate. Keep a consistent walking speed; the walk‑behind calibration assumes 3.5 mph, and any deviation skews the flow. Follow a cross‑hatch pattern, first pass at 50 % then perpendicular pass, overlapping the effective width each time. Check a 1,000‑sq‑ft test area to verify output before full‑lawn application. Rake lightly to incorporate the seed into the soil and avoid piling it in one area.
Common Seeding Mistakes & How to Avoid Them
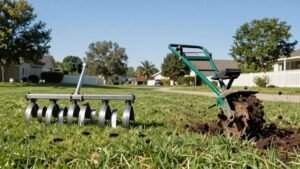
If you skip any of the essential steps—timing, soil preparation, seed selection, rate and depth, or post‑seeding care—you’ll quickly see poor germination, patchy coverage, or outright failure. To avoid the most common mistakes, first align with Optimal planting timing: soil must be above 50 °F for cool‑season grasses and not exceed heat thresholds that trigger dormancy. Test pH, aerate compacted ground, and remove scalping debris to guarantee solid seed‑to‑soil contact. Choose seed based on Seed quality factors such as climate match, shade tolerance, and drainage compatibility; premium varieties outperform cheap alternatives. Apply the correct seeding rate and plant at a depth no deeper than the seed’s length. Finally, water consistently, delay herbicide use, and avoid traffic until seedlings are established. Using a scarifier can greatly improve seed‑to‑soil contact on compacted or uneven areas.