First, park the mower on level ground and check the oil level, using SAE 10W‑30 or newer. Make sure the fuel valve is ON, the throttle lever is set to CHOKE, and the flywheel brake lever is pulled tight against the handle. Place your foot on the deck step, grip the starter cord, pull gently then yank outward, repeating the pull‑recoil cycle until the engine fires. After three seconds, release the choke, let the engine idle, then shift the throttle to FAST for cutting. Continue for more detailed tips.
Pre‑Start Checks for a Push Mower Start – Fuel, Oil, and Safety Basics
Before you pull the starter cord, run through a tight pre‑start checklist that covers oil, fuel, and safety; doing so verifies proper lubrication, reliable combustion, and a hazard‑free mowing zone. Check oil on a level surface: pull the dipstick, wipe it, reinsert, and verify the level stays between the marks. Use SAE 10W‑30, API SJ or later, and look for leaks around the engine and air cleaner. Fill the tank with 86‑octane unleaded gasoline, max 10 % ethanol, avoiding stale or contaminated fuel; stop at the ridge, wipe spills, and refuel only outdoors after the engine cools. Inspect the mowing area for debris, validate blade bolts are tight, and confirm the blade sharpening schedule is current. Finally, decide on a mowing pattern selection that matches terrain and grass height before you start. Check the fuel valve before turning it on. Ensure the spark plug is clean and properly gapped to promote a smooth ignition each time you pull the cord. Inspect the spark plug for carbon buildup before each season. If the mower still won’t start, consider checking the air filter for clogs that can restrict airflow.
Set the Fuel Valve and Throttle for a Quick Push Mower Start
The fuel valve must be set to ON before you touch the throttle, because only the ON position allows fuel to flow from the tank to the carburetor. Perform a quick fuel valve inspection: align the indicator, confirm the lever sits flush in the ON notch, and verify no debris blocks the passage. Next, execute throttle lever maintenance. Rotate the lever to CHOKE for a cold start, then pull the starter. Once the engine fires, shift the lever to FAST for normal operation, keeping it steady while you engage the Roto‑Stop. Remember to return the lever to STOP after mowing, then turn the fuel valve OFF to prevent leakage. This precise sequence eliminates hesitation, guarantees consistent fuel delivery, and speeds up the overall start process. The fuel line connects the tank to the valve, ensuring proper flow. Always check the spark plug condition before starting to avoid misfires. A properly gapped spark plug ensures optimal ignition timing. Drain plug removal helps prevent oil spillage when servicing the mower.

Perfect Compatibility: This Fuel Shutoff Valve (Part Number: 16950-Z0Y-003) Is Designed To Be Compatible with Honda Lawn Mower Models, Including HR215K1, HRB215K3, HRB215K4, HRB216, HRC215K1, HRC216K2, HRC216K3, HRM215K3, HRM215K4, HRR216K2-K9, HRS216K1-K4, HRT216K1-K2, HRX217-K4, HRZ216, Ensuring A Precise Fit And Optimal Performance
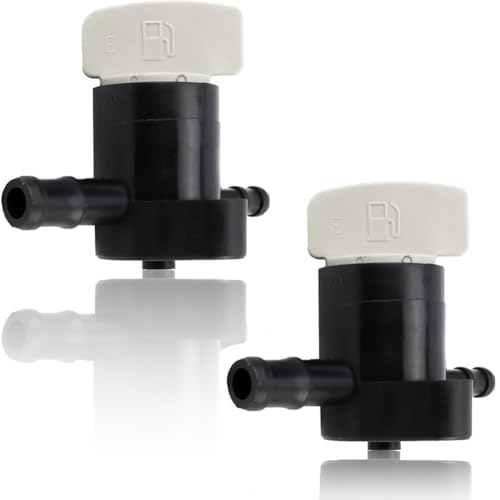
For Honda oem 16950-Z0Y-003 / GCV160-LAOS3A / GCV190-LABHH / GCV160-LAOS3B / GCV190-LABHH-ED / GCV160-LA0S3-ED / GCV160LA0N5BR lawnmower garden engines parts fuel shut off valve petcock

GENUINE OEM HONDA 16950-ZM0-003 GC135 GCV135 GCV160 GCV160A GCV160LA GCV160LA0 GCV160LA1 GCV160LE GCV190A GCV190LA GSV190A GSV190LA GXV50 GXV50U GXV50UT GXV57U GXV57UT HS520 HS520K1 HS720 Lawn Mower engine Fuel Cock Shut Off Valve PETCOCK New
Position the Brake, Blade, and Clutch Levers on a Push Mower
If you grip the handle firmly, you’ll notice three levers that must be positioned correctly before the mower can run safely: the flywheel brake lever stays locked against the handle to prevent engine start until you release it, the blade control lever must be held fully forward to engage the blades, and the drive clutch lever needs to be disengaged to stop forward propulsion. First, pull the flywheel brake lever tight against the handle; this engages the flywheel brake and prevents the engine from turning. Next, push the blade control lever forward until it clicks; this engage blade control and locks the blades in the fast‑throttle position. Finally, verify the drive clutch lever is fully released, confirming no forward drive is possible. Check each lever’s position before pulling the starter. Ensure the engine has cooled before performing any adjustments. Also, inspect the spark plug for fouling or wear, as a defective spark plug can prevent the mower from starting. A quick spark test can confirm whether the plug is delivering a strong, consistent spark. Proper blade height adjustment helps prevent scalping and promotes healthy grass growth.
Master the Manual Pull‑Start Technique for a Push Mower
One quick step guarantees a safe, reliable start: set the blade‑control lever to Release, the drive‑clutch lever to Release, and the throttle to Choke before you even touch the cord. Place your foot firmly on the deck step, then grip the starter cord with thumb and forefinger. Pull gently until resistance builds, then yank outward briskly, allowing the cord to recoil naturally. Repeat the pull‑recoil cycle until the engine fires. If the engine stalls, troubleshoot pull start issues by checking cord tension, ensuring the choke remains engaged, and confirming levers stay in Release. Consistently applying this rhythm will optimize cord pulling technique, reduce wear, and give you a repeatable, efficient start. Always inspect the mower’s **blade‑control lever** for secure positioning before each use. Wearing protective gear such as safety glasses and sturdy shoes further reduces the risk of injury while operating the mower. Properly adjusting the engine speed before mowing ensures a smooth cut and protects the mower’s components.
Warm‑Up the Engine Before a Push Mower Start
Because a cold engine struggles to vaporize fuel, you should engage the choke and let the mower idle for at least three minutes before mowing. You pull the starter, set the throttle lever to the choke position, and watch the engine run steadily. During this period the restricted air intake enriches the mixture, allowing proper fuel vaporization and raising the oil to a proper oil temperature. Maintain the idle until the temperature gauge (if present) indicates the oil has thinned, typically three minutes, longer when ambient temperature falls below 70 °F. Then, observe the choke disengagement timing: release the choke gradually after the warm‑up, ensuring the engine shifts smoothly to idle without stalling. This disciplined approach prevents flooding, protects internal components, and readies the mower for immediate, reliable cutting. Check the spark plug before starting to ensure proper ignition. Performing a voltage check on the mower’s battery can help confirm the electrical system is ready for reliable operation.
Why and When to Set the Throttle to FAST for Cutting
When you pull the starter and the engine is humming, you must immediately set the throttle lever to FAST; this triggers the governor to lock the engine at its maximum no‑load speed (2,900‑3,000 rpm). The FAST setting guarantees the prescribed blade speed, which is essential for ideal lawn mowing performance. At FAST, the fan action lifts grass efficiently, allowing the blades to slice cleanly rather than tear. Blade speed maintenance stays within the design envelope, preventing over‑speed fracture and ensuring the blade control lever engages reliably. You should keep the throttle in FAST for the entire cut, because any deviation reduces fan lift, compromises cut quality, and can cause vibration that signals a malfunction. This disciplined approach maximizes efficiency and safety. Adjust the governor lever counterclockwise to fine‑tune the engine speed if it tends to over‑rev. A sharp mower blade reduces strain on the engine and promotes healthier grass. Maintaining sharp blades also improves cutting efficiency and reduces fuel consumption.

Part Number: 17850-VG3-D01 Mower Cable

✅65" Lawn Mower Throttle Cable: This lawn mower throttle cable is approx. 65 in / 165 cm, offering flexible routing for replacing stuck, loose, worn, broken, or aging throttle cables on many walk-behind push garden mowers.

Throttle Control Lever Wiring Harness Assembly Replacement Part Ideal Replacement Part: Replacement for Honda throttle control lever & cable assembly Compatible with Honda Engines: Compatible with Honda GX160 Compatible with Honda GX200 Compatible with Honda GX140 Used in road rollers, pavers, lawn mowers, generators, and water pumps
Adjust Throttle on the Fly for Grass Types on a Push Mower
How does the mower keep its blade speed steady as you move from short to tall grass? The governor senses load changes and modulates throttle automatically. When you hit dense or tall grass, the crankshaft slows, flyweights relax, and the governor spring adjustment opens the throttle to maintain RPM. If you notice the engine lagging, bend the governor spring post left to increase tension, which raises speed for thick grass. Conversely, bend right to lower tension for light, short grass. A pneumatic governor behavior works the same way, using an air vane to feel pressure shifts on the flywheel; the vane pulls the throttle closed as speed rises and opens it when load spikes. Adjust on‑the‑fly by feeling grass discharge and RPM stability, without stopping the mower. Proper timing of lawn care, such as early fall aeration, maximizes root recovery and overall lawn health. Avoid mowing when temperatures consistently exceed 90 °F to prevent turf damage. Understanding grass growth cycles helps you schedule mowing for optimal health throughout the year.

Package:You will get 36pcs Throttle Springs Assortment for Honda Briggs and Stratton Small Engines

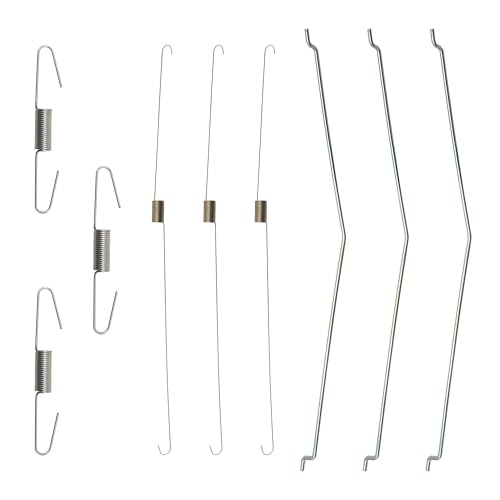
For Honda Part number: 16561-Z0L-000, 16562-ZM0-000 and 16555-ZM0-000.
Shut Down Safely: Release Levers & Turn Off Fuel After a Push Mower Use
The governor’s automatic throttle adjustment keeps the blade at a steady RPM, but once the grass is cut you must shut the mower down methodically. First, pull the blade‑control lever; this instantly disengages the blade and cuts engine power. Immediately after, move the throttle lever to STOP to complete the shutdown sequence. Then turn the fuel valve to OFF, preventing fuel from reaching the carburetor and drying it out during storage. Conduct a quick fuel tank inspection to verify the valve is sealed and no leaks remain. Finally, disconnect the spark‑plug cap for safety and perform spark plug maintenance if the plug shows fouling or wear. These steps protect the engine, guarantee safe storage, and prolong mower life. Check engine oil level before shutting down to ensure proper lubrication for the next use. Wear protective gear before beginning any maintenance to reduce the risk of injury. Inspect the recoil spring to confirm it is not damaged before re‑installing the pull cord.
Diagnose and Fix No‑Start Problems in Under a Minute?
Kick‑start troubleshooting by zeroing in on the three most common culprits—fuel delivery, spark generation, and air‑oil flow—so you can pinpoint the fault and fix it in under a minute. First, perform fuel system maintenance: drain gasoline older than 30 days, clear the vent in the fuel cap, and inspect the fuel line for cracks or blockages; clean any restriction with compressed air and replace a clogged filter. Next, execute carburetor cleaning procedures: clamp the line, remove the carburetor, spray all passages with cleaner, reassemble, and reinstall. Finally, verify spark generation by checking for a blue spark at the plug, cleaning a fouled plug, and confirming the ignition switch is “on.” If the air filter is dirty, replace it, and guarantee the choke is engaged before pulling the starter. Check the battery to ensure it has enough voltage for the starter.

【Honda Lawn Mower Tune Up Kit】Air Filter Replace # Honda 17211-Z8B-901. Fuel Filter Replace # Honda 16952-Z8B-000. Spark Plug Replace # NGK BPR6ES F6RTC

Hond-a Fuel Filter Replace HOND-A # 16952-Z8B-000

Replace for Honda 16952-Z8B-000 fuel filter; Replace for Honda air filter 17211-Z8B-901; 17211-ZL8-023 air filter; there are several kinds of fuel filter and air filter for honda same engine, please check the OEM number and detail serials of your engine before buying; replacement parts for honda gcv 160 gcv 170 gcv 190 gcv 200 fuel filter air filter