Secure the mower on a stable table, tilt it so the air filter and carburetor face up, and disconnect the spark plug. Wear gloves, safety glasses, and ear protection, then brush off loose grass. Coat each reel blade with coarse grinding compound and rotate the reel counter‑clockwise for ten minutes, followed by fine powder and a rag wipe. Tighten the wheel bolt with a 17 mm wrench, check for tilt or nicks, and torque all bolts to spec before a test cut. Continue for detailed bed‑knife sharpening and clearance adjustment.
Secure the Mower and Clean Blades Before Sharpening
Before you begin sharpening, make certain the mower is securely positioned and the blades are clean. Tilt mower position so the air filter and carburetor face up, then set the unit on a stable table to prevent tipping. Disconnect spark plug wire before any handling; this isolates power and avoids accidental starts. Remove loose grass and debris with a brush, then wash the blades to eliminate residue that could interfere with filing. For reel mowers, keep the marked blade side facing outward initially to preserve orientation. Verify that the mower is upright and steady, then inspect each blade for rust or damage. This preparation guarantees a safe, controlled sharpening environment. Sharper blades also reduce fuel consumption during mowing, which savings. A sharp cut promotes healthier grass growth by preventing tearing and disease spread. Using a bench grinder can speed up the sharpening process while maintaining consistent blade angles. Maintaining the proper blade angle ensures optimal cutting efficiency and prolongs blade life.
Gather Tools and Safety Gear for Sharpening Mower Blades
Now that the mower’s stable and the blades are clean, gather the gear that will keep you safe and the tools that will let you work efficiently. First, put on protective gloves to secure a firm grip and prevent cuts while you handle sharp edges. Wear safety glasses or goggles to shield your eyes from sparks and metal fragments, especially when using a grinder. If you’ll employ a power‑driven sharpener, add ear protection to guard against high noise levels. Secure the blade in a bench vise; this immobilizes the metal and eliminates slippage. Choose a sharpening kit with a grinding wheel, nylon guide, or a manual metal file, and keep a blade balancer handy. Before you start, inspect for blade damage and consider blade replacement options if cracks or severe wear appear. Sharpen the blade before the first cut of the season to avoid ragged edges that can cause lawn disease. Regularly check the blade’s edge angle, as maintaining the recommended 30‑degree bevel helps ensure consistent cutting performance. Properly balance the blade after sharpening to prevent vibration and uneven wear. Ensuring the blade is properly center‑balanced reduces motor strain and extends mower lifespan.
Apply Sharpening Compound and File the Reel Blades Properly
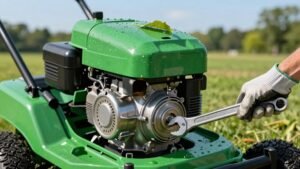
Typically, you’ll start by coating each reel blade with a coarse grinding compound to create the initial abrasion needed for a sharp edge. Apply the compound evenly, then rotate the reel counter‑clockwise using a deep socket or crank for ten minutes, establishing a consistent grinding pattern against the bedknife. While the blades spin, monitor compound penetration; the surface should become uniformly shiny and flat. After the initial lap, reapply fine grinding powder directly onto the edges without stripping the coarse layer. Continue cranking until the fine compound yields a polished finish, checking for even shine across all blades. Finally, wipe away excess residue with a rag, ensuring no grit remains before moving to re‑assembly. Use a 17mm wrench to tighten the wheel bolt after reassembly. Remember to wear protective gloves to prevent injuries while handling sharp blades and abrasive compounds. Secure the mower before starting the sharpening process. Properly checking deck level before you begin ensures a uniform cut and protects the blades from uneven wear.
Verify Blade Sharpness Before Re‑assembly
If you’ve finished filing and polishing the reel blades, you must confirm they’re sharp and balanced before re‑assembly. First, hold the blade horizontally and release; it should stay level, which lets you identify blade balance quickly. Use a screwdriver through the center hole or a nail in a vise as a makeshift scale, and observe any tilt. Next, verify blade edge sharpness by slicing a thin strip of grass or a piece of paper—if it cuts cleanly like a butter knife, the edge is adequate. Inspect both sides for nicks, chips, or rough spots, and feel for any file teeth catching. Any imbalance or dullness must be corrected before you re‑install the reel. Grass buildup can also cause imbalance, so ensure the blade is clean before testing. A sharp edge also promotes healthy grass growth by preventing tearing. Proper blade sharpness reduces fuel consumption by allowing the mower to cut efficiently.
Sharpen the Bed Knife and Set Blade Clearance
After confirming the reel blades are sharp and balanced, remove the bed‑knife from the bedbar with a socket wrench and the TOR510880 tool, then scrape off any rust or scale before reinstalling. Grind the bed‑knife flat on the machine, compensating for the cast‑iron base‘s warp; use the 131‑6828/131‑6829 tools to set the top grind angle for the most suitable edge retention. Apply valve lapping compound evenly with a brush and run the back‑lapping process until the knife shines uniformly. When reinstalling, tighten the rivet bolts to the manufacturer’s torque, then spin the reel to check for scraping. Adjust blade clearance accurately by loosening the reel bolts, moving the blades until they almost touch the knife across the full width, and retightening. Guarantee even contact across bedknife before final testing. The high‑cut bedknife is recommended for cutting heights of ½‑¾ inch to extend lifespan. Most standard mower blades use a right‑hand thread to secure the blade, while some models employ a left‑hand thread to prevent loosening during operation.
Oil the Gears, Tighten All Bolts, Then Try a Test Cut
Oil the gears and tighten every bolt before you take the mower for a test cut, because proper lubrication and secure hardware are essential for safe, efficient operation. First, apply a thin layer of Double‑00 grease to wheel shafts and gears, using your finger for an even spread. Follow with a spray of penetrating oil—Fluid Film or a Teflon‑based product—behind the gears, then spin the wheels to distribute it. Grease the plastic wheel interiors and metal shafts lightly, and spray the front wheel adjusters for smooth sliding. After reassembling, torque all bolts to the manufacturer’s specs, double‑checking handle brackets and the drain plug. Reconnect the spark plug, then perform a short test cut. Push the mower, listen for abnormal noises, and inspect cut quality; a clean, even strip confirms the gears are properly lubricated rotating the hardware is secure. Regular lubrication ensures the wheel bearings wear evenly, extending mower life. Proper maintenance schedule can significantly affect the mower’s overall durability. Check oil level before each use to catch early signs of wear or contamination. Using the correct small‑engine oil helps prevent wear and maintains optimal performance.