You’ll convert a standard mower into a fast, battery‑powered remote‑controlled cutter that handles rough terrain with Flysky steering and regenerative power. First, define the goal and specs—engine size, weight bias, and control algorithm priorities. Then gather a reliable RC receiver, motor controller, steel frame parts, and safety gear. Wire the receiver to the controller, mount wheels or tracks, and reinforce the frame. Install fuses, switches, and voltage monitoring for safety. Fine‑tune the controls and test everything before you move on to the deck.
Define Your Remote‑Control Mower Goal
When you set your remote‑control mower goal, start by pinpointing the core problem you want to solve—whether it’s giving wheelchair users independent lawn care, tackling rough pasture terrain, or converting a push mower into a versatile, mulching‑capable machine. You then translate that purpose into concrete specs: a 14HP V‑Twin engine for brush clearing, a 70‑30 weight bias toward drive wheels for stability, and a compact width for edge work. Prioritize enhancing control algorithms so the Flysky FS‑i6x can manage forward/reverse, left/right, ignition, and starter channels with fast, reliable response. Simultaneously, design the power bus and lead‑acid pack to maximize battery life, letting regenerative braking and self‑charging keep the mower running longer between charges. This focused definition guides every component choice and wiring decision. The project also involves modifying front caster bracket from the mobility scooter to accommodate the new drive configuration. Zero‑turn mowers achieve their tight turning radius by independently pivoting each wheel. Adding a GPS waypoint system can further improve autonomous navigation across complex lawns. Regularly inspect the mower blade for uneven cuts to catch wear early and maintain lawn health.
Gather Parts, Tools, and Safety Gear
Even if you’ve already nailed the design, gathering the right parts, tools, and safety gear is the next critical step. Choose reliable electronic components: a Spektrum AR610 RC receiver ($29), a DXe transmitter ($60), and a motor controller like the Dimension Engineering 2x60A ($180) or Cytron SmartDriveDuo‑60 ($150). Pick affordable structural materials: a cheap used mower base ($55) or a Poulan Pro steel deck ($150), steel angle iron for the frame, and a steel plate for the battery tray. Stock 12‑gauge wire, 18/2 low‑voltage cable, Wago lever‑lock nuts, and assorted nuts, bolts, washers. Don’t forget safety gear—an orange strobe ($20), rubber grommets, a Pololu RC switch and relay ($10), LED lights, and a 12V cigarette adapter with switches ($50). This kit gets you ready to assemble without excess. You’ll also want to consider the lawn size to ensure the mower’s power and cutting width are appropriate for your yard. Noise level can be a decisive factor for residential areas. Proper battery maintenance can significantly extend the lifespan of your mower’s power source.

3S-6S 12V 24V 110A Bidirectional ESC (Attention: 100A: Only applicable to motors below 997, 110A: This ESC is designed for small motors. If you want to run higher currents, you need to add water cooling for heat dissipation. Industrial motors with a power of less than 600W)

Versatile All-Terrain Remote Control Lawn Mower perfect for steep slopes, tall grass, large lawns, hillsides, orchards, gardens, and rough terrain. The 20 inch cutting width and adjustable cutting height 0.79-5.9 inches easily handle various mowing needs in different scenarios.

Superior Slope Climbing and Heavy-Duty Track All-Terrain Design: Equipped with a rubber track system, this machine easily conquers steep slopes up to 40-45 while adapting to complex terrains like orchards, farms, hillsides, embankments, wetlands, and dense brush. It can effortlessly traverse ditches, soft soil, and thick vegetation areas that ordinary small mowers cannot handle, solving multiple all-terrain challenges with a single machine
Wire the RC Receiver to the Motor Controller
First, connect the receiver’s signal pins to the motor controller’s channel inputs using the 0.1‑inch servo extensions, then tie the receiver’s ground to the controller’s ground to guarantee a common reference. Use a Y‑splitter cable so both left and right motor controllers share channels 1 and 2, then configure the right controller in mixing‑mode right and the left in mixing‑mode left. Map receiver channel to motor direction by assigning channel 1 to forward/reverse on the left side and channel 2 to the right side, ensuring each PWM pulse drives the correct motor polarity. For handling receiver signal loss scenarios, add a pull‑down resistor on each signal line and program the controller to brake when the pulse width drops below the safe threshold. Keep the BEC jumper removed if you power the receiver separately to avoid shorts. This wiring gives you reliable, responsive control. Motor polarity does not affect the direction of rotation, so the motor terminals can be connected to the speed controller in either order. Always inspect the mower blade’s cutting edge orientation before installation to avoid improper blade alignment. Remember to wear protective gloves while handling the blade to prevent cuts. Wear protective gear is essential to reduce the risk of injury while operating the mower.

Servo extension cord sizes: Servo extension cable have 5 different lengths of 12.4 cm/ 4.88 inch, 17.5 cm/6.89 inch, 22.3 cm/ 8.78 inch,33 cm/ 13 inch and 52.5 cm/ 20.67 inch, each length has 4 pieces servo extension cords

3-Pin extension cable: The servo extension lead wires featured with 3 pins, and each has an angle, in case you will install incorrectly, convenient use design.

5 Types: 6 cm / 2.36inch;15 cm / 5.9 inch;30 cm/ 11.8 inch; 50 cm/ 19.7 inch and 100cm/ 3.3ft
Mount Wheels or Tracks and Reinforce the Frame
After wiring the receiver and motor controller, you’ll need to secure the wheels or tracks and reinforce the frame. Remove the stock wheels, then bolt 12 mm threaded rods where they sat to create a suspension point for 13‑inch rear wheels or 14‑inch track wheels. Add front caster wheels for steering support, and attach a steel box frame around the uprights, welding it to inner supports for frame stabilization. For tracks, cut 2×4s, screw them to tow straps, and slide the assembly onto the drilled corner holes, using slide bolts to lock it in place. Jack the rear and front, drape the track over the sprocket, and install the gray spring in the tensioning bolt pocket. Verify clearance and alignment before tightening for proper track tensioning. Jack the machine up at the rear point to ensure the track is 5 inches off the ground. Remember to wear protective gear while performing these adjustments to reduce the risk of injury. Use a hydraulic floor jack to lift the mower safely and evenly. Always follow the step‑by‑step procedure to prevent strain and equipment damage.

Fits most Toro, Yard Machines, Troy-Bilt, Bolens, MTD, Yard-Man, Huskee, Husqvarna and Craftsman brand of walk-behind mowers with 11" rear wheels

11” Rear mower wheel, non-drive (free wheel) for Yardmax push mowers.

Fitment for Toro, Yard Machines, Troy-Bilt, Bolens, for MTD, Yard-Man, Huskee, for Husqvarna and Craftsman brand of walk-behind mowers with 11" rear wheels
Install Switches, Fuses, and Voltage Monitoring
Once you’ve bolted the wheels and reinforced the frame, the next step is to wire the power‑control hardware. Begin with Fuse considerations: the Sabertooth driver needs a 100 A fuse on the positive lead, while accessories run on a 15 A fuse with 16‑gauge wire. Mount the fuse holder inline before the quick‑connect positive cable. For Switch configuration, install a three‑prong LED rocker on the negative lead; connect Earth to battery ground, Supply to the fused positive line, and Load to the motor driver. The illuminated blue light shows when power’s on. Run 10 AWG high‑current wire from the battery to the driver, and a step‑down regulator for 5 V accessories. Hook a voltage sensor to the driver’s sense pins, then verify battery voltage with a multimeter (≈13.1 V idle, 14.2 V at full RPM). Use a test light on ground probes to confirm voltage at each switch and module. Quick disconnect ensures easy battery removal for maintenance. Most electric lawn mowers operate within a 12‑40 V range, and selecting a battery voltage that matches the mower’s motor design is essential for optimal performance. Regular maintenance habits can significantly extend the mower’s service life. Proper voltage monitoring helps detect weak cells before they cause a failure.

BOJACK High quality ANL fuse holder, come with 100 Amp gold plating ANL fuse

ANS car fuse holder is a small M5 bolt fuse holder for Midi fuse, high current screw fuse 100A Amp.

Material: gold-plated metal, polycarbonate transparent PC shell
Fine‑Tune, Test, and Troubleshoot the Mower
When you’ve finished wiring the power‑control hardware, start fine‑tuning the mower’s controls, testing each function, and troubleshooting any issues before the deck is mounted. Reduce the max limits on the right/left and reverse channels to a lower percent, making steering smoother. Trim throttle input so the wheelchair motors don’t lurch. Verify relay contacts and rewire module pins in the correct sequence: black, red, white forward; T1 to pin six, T2 to pin three, engine to pin five. Hit the micro switch if the mower circles. Turn the transmitter on first, off last, then unplug the starter and test kill/start relays. Add fuel, start the engine, engage blades with the green button, and run drive, steering, and blade tests. For signal range optimization, clear obstructions, pair the remote, restart devices, and move the base station closer if drops persist. Perform battery health monitoring by checking charging voltage, securing batteries, and inspecting for melted insulation or abnormal voltage readings. Test fail‑safes, update software, and guarantee the alternator’s output matches pulley specs. The front casters were powder coated perfectly before reassembly. Ensure the air filter is clean to prevent fuel starvation. Check solenoid continuity before powering the mower to avoid electrical issues. Properly sharpen the blade using a bench grinder to maintain optimal cutting performance.

The package contains 2 blades and bolts.

⚡【Adjustable mowing height】: The robot mower can adjust the cutting height by remote control. The height of the chassis can be raised or lowered at will. The remote control is flexible and free, and can complete actions such as 360-degree rotation and climbing on the spot.
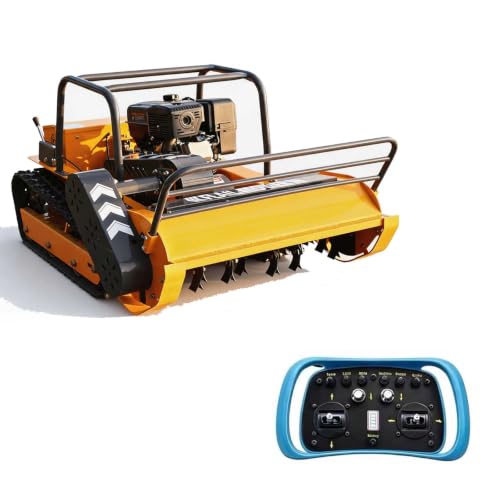
【High-Power Flail Cutting】 Equipped with a 459cc commercial engine and reinforced flail head, this remote control lawn mower shreds dense grass, weeds, and light saplings (up to 2 fine mulch in a single pass, surpassing standard bush hog mower performance.