Identify spurge by its low‑lying pinkish stems, opposite dark‑green blades with a purplish spot, and milky sap. Apply a pre‑emergent herbicide (e.g., Dimension 2EW, Prodiamine) when soil consistently hits 53‑55 °F, water in ½ in of rain or irrigation within 21 days, and follow label rates per 1,000 sq ft. For existing plants, spot‑treat with a post‑emergent spray (MCPA, triclopyr, or dicamba) using a low‑pressure fan nozzle on a calm evening, then water lightly. Hand‑pull any survivors, mulch the area, and keep an eye on soil temperature for future applications. Continue for the next steps on timing, coverage, and prevention.
Identify Spurge Weed in Your Lawn
When you spot a low‑lying, pink‑ish plant with fine hairs and a milky sap, you’re likely looking at spotted spurge, a broadleaf summer annual that forms a dense mat up to three feet wide. Examine the leaf characteristics: small, oval, dark‑green blades 1/6‑2/3 inch long, often hairy underneath, with a dark purplish spot centrally. Leaves arrange opposite on the stem, distinguishing them from other turf weeds. Observe the growth habits: prostrate stems spread horizontally, reaching 20 inches, and may turn upward when competing for light. Unlike prostrate spurge, these stems don’t root at nodes, so the mat remains surface‑level. The reddish‑pink stems are fine‑hairy and exude milky sap when broken, confirming identity. Use these traits to pinpoint spurge before treatment. Seeds remain viable for years, allowing the weed to reestablish from old seed banks. Conduct a germination test to verify seed viability before deciding on control measures. Grass seeds originate from mature plants through pollination and fertilization.
Select the Best Pre‑ or Post‑Emergent Herbicide for Your Situation
Choosing the right herbicide hinges on whether you need to stop spurge before it germinates or eliminate plants that have already emerged. For pre‑emergent control, select a product labeled for your grass type—Dimension 2EW, Ferti‑Lome, Prodiamine 65 WDG, Barricade, or Resolute—ensuring product compatibility with turf or ornamental beds. Apply when soil temperature stays below 55 °F, or in fall before the first frost, to create a chemical barrier that prevents seed sprouting. Pre‑emergent herbicides work by inhibiting seed germination and early growth, providing broad‑spectrum control across many weed species. If you missed that window, a post‑emergent like Spurge Power (MCPA, Triclopyr, Dicamba) or Fahrenheit provides rapid, cost‑effective control of existing foliage. Verify label instructions for mowing and watering, and consider coverage area to minimize applications and expense. Uniform application timing is crucial for maximizing herbicide efficacy and minimizing damage to desirable grass. Adding a layer of organic mulch can further suppress weed emergence and improve soil moisture retention.
Apply Pre‑Emergent Granules: Timing, Pattern & Watering
After picking the right herbicide, you need to apply the pre‑emergent granules at the ideal time, with the correct pattern, and then water them in properly. Begin by monitoring soil temperature trends; when the soil consistently hits 53‑55 °F for several days, you’re in the pre‑germination window. Calculating granule application rate follows the label’s pounds‑per‑1000 sq ft guideline—use a calibrated broadcast spreader, walk a steady pace, and overlap edges lightly. Apply on dry grass, dividing the total amount into two passes if the rate is high. Immediately after spreading, water in 0.5 in of irrigation or rain within 21 days to activate the barrier, ensuring the soil can absorb water without being saturated. This precise timing, pattern, and moisture management maximizes spurge control. Broadleaf weed control is also enhanced when the herbicide creates a soil barrier that blocks seed germination. Seasonal temperature cues help you align treatment with the optimal growth phase of both grass and weeds. Soil microbial activity can further break down residual herbicide, reducing long‑term persistence. Proper soil aeration improves root health and helps the lawn recover faster after treatment.
Spot‑Treat Small Spurge Plants With Evening Sprayer Use
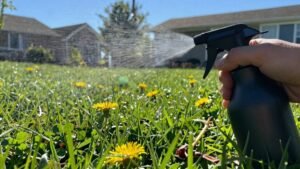
If you spot a few spurge seedlings in the evening, grab a battery‑powered 4‑gallon sprayer with a TeeJet foliar tip or a handheld 1‑1.5‑gallon pump sprayer and apply the calibrated Fahrenheit herbicide solution directly to the foliage, using a fan nozzle to wet leaves evenly without dripping. Set the sprayer to low‑pressure, fan‑nozzle mode—this is the proper sprayer settings for spot treatment. Fill the tank half with water, add 0.069–0.28 oz of Fahrenheit per 1,000 ft², then top off with water to one gallon; shake to mix. Aim the spray at each plant’s canopy, ensuring thorough spot coverage while avoiding runoff onto grass. Work on a calm night when temperatures are between 90 °F and the safe drop‑off point; re‑check after 1–2 weeks and re‑apply if any seedlings persist. Spotted spurge forms thick mats up to 3 feet in diameter, so early removal prevents rapid spread. Incorporating deep mulching can further suppress spurge by limiting light exposure to seedlings. Adding a soap‑based herbicide to your lawn care routine can enhance weed control without harming the grass.
Hand‑Pull Spurge and Mulch Safely When Chemicals Fail
When chemicals don’t work, hand‑pulling spurge and mulching the cleared area is the most reliable way to stop it from spreading. First, water the bed lightly to loosen soil; moist conditions create optimum hand pulling conditions. Wear gloves, grasp the whole plant at the base, pinch the center, and pull straight up to extract the taproot intact. This avoids root breakage that can trigger regrowth. Use effective sap removal techniques: rub the weed on the glove, discard the glove, and wash hands before touching anything else. After extraction, scatter Preen Mulch with Extended Control Weed Preventer, then lightly water to activate the granules. Mulch blocks seed germination and, combined with proper mowing, suppresses future spurge. Milky sap indicates spurge when the plant is broken. Consider applying a targeted soil‑active herbicide to the surrounding area to prevent any remaining root fragments from establishing.
Use Ready‑to‑Use Spurge‑Targeted Commercial Products
One of the most efficient ways to eradicate spurge is to apply a ready‑to‑use commercial herbicide such as Spurge Power or Surge Broadleaf. These products combine MCPA, Triclopyr, and Dicamba for selective post‑emergent control, killing spotted spurge and over 75 other broadleaf weeds without harming turf. Mix the concentrate with water according to label directions; a pint covers up to 16,000 sq ft, so concentrates offer greater coverage on large lawns. Apply during the active growth phase of the weeds, targeting both warm‑ and cool‑season grasses while avoiding dichondra and carpet grass. Observe rapid yellowing within hours and expect complete die‑back in 10‑14 days. Follow safety guidelines: keep pets away until the spray dries, and verify grass‑type compatibility before use. The product is sold in a 1 gallon package, providing ample volume for extensive applications. Proper timing ensures the herbicide contacts the weed’s foliage while it is actively photosynthesizing, maximizing absorption efficiency. Understanding the selective systemic nature of 2‑4‑D helps users apply it safely and effectively. Using a low‑toxicity approach can further reduce environmental impact.
Prevent Future Spurge Outbreaks With Seasonal Fertilizers
A well‑timed fertilization schedule is the cornerstone of spurge prevention, because a nutrient‑rich, dense turf outcompetes the weed for light, water, and nutrients. Apply a balanced N‑P‑K blend in early March, when spurge seeds begin to germinate, to boost turf density improvement before seedlings emerge. Seasonal soil testing helps confirm nutrient levels and pH before each application. Follow with a mid‑summer feed to sustain competitive grass species during peak growth, and finish with a fall application that thickens the canopy for next‑season resistance. Align each application with your lawn’s growth cycle, avoiding gaps that create bare patches. Choose region‑appropriate grasses—Bermuda, Zoysia, or St. Augustine—to maximize fertilization response. Consistent timing, proper rates, and species selection together maintain a vigorous, shade‑producing turf that suppresses spurge naturally. Applying herbicides at the yellow bract stage further improves control. Proper timing soil temperature monitoring ensures the fertilizer is most effective. Cool‑season grass activation in early spring also helps establish a dense lawn that resists spurge.
Troubleshoot Common Spurge Problems: Heat Stress, Missed Spots & Re‑Growth
Even with a solid fertilization plan, spurge can still appear when heat stress weakens the turf, when small patches are missed during treatment, or when seeds survive for later germination. To combat heat‑induced spurge, raise mowing height to at least 2 inches, reduce thatch below ½ inch, and irrigate deeply but infrequently so the root zone stays moist without encouraging surface moisture. Apply pre‑emergent herbicide early summer, then re‑apply after heavy rain or high UV exposure, because heat degrades the product. Inspect the lawn for thin, open areas; those are likely missed spots where spurge seeds can germinate. Use solarization or spot‑treat with a post‑emergent label to eliminate re‑growth. Throughout, target vigorous turf establishment and optimize soil conditions to keep the canopy dense, shading the soil and denying spurge the light it needs to sprout. Leaves curl when temperatures rise, further stressing the grass.